
A patch release is the hardest day for a download server: millions of clients ask for the same multi-gigabyte file within hours. It is also the workload a CDN caches best, because that file is identical for every player and never changes once shipped. This guide builds a downloads resource around that fact: the files live in a bucket on Melbicom S3 Object Storage that the CDN reads with its own key, the cache holds each file for a full day at a time, the misses that remain funnel through Origin Shield, a backup origin stands by for release day, entitled-only builds demand a signed link, and the country statistics show the rollout in progress.
Every step uses a feature your CDN resource already has; each one links to the tutorial that covers its every field.
Prerequisites
- An active CDN resource created for your downloads hostname. See Add Your First CDN Resource.
- Your domain pointed at the CDN and serving traffic through it. See Point Your Domain at the CDN.
- Client Area access to the package.
- A Melbicom S3 Object Storage service with a bucket for the patch files (Create a Bucket on Melbicom S3 Storage) and the MinIO Client configured for it (Install and Configure the MinIO Client for Melbicom S3). A web server of your own can take the bucket’s place; Step 1 says how the guide changes.
- Optional, for Step 5: a second origin server holding the same files, reachable by IPv4 address or domain name.
Why Downloads Are the Perfect Cache Workload
- One fetch serves a region: a patch is byte-identical for every player, so once an edge holds it, every later request in that region is answered without your origin being involved.
- Release day stays survivable: Origin Shield concentrates the simultaneous cache misses, and a backup origin takes over if the active one fails mid-rollout, with no DNS change.
- Entitlement stays enforceable: Secure Links make paid or pre-release builds require a signed token, while public patches stay open.
Step 1: Serve the Files from a Melbicom S3 Bucket
A patch archive does not need a web server behind it; it needs storage that holds multi-gigabyte objects and answers byte-range requests, which is what a bucket is. Upload each build under its own key with the MinIO client, for example releases/1.4.2/patch.bin, and the versioned-filename rule of this guide is enforced by the storage layout itself:
mc cp patch-1.4.2.bin melbicom/100-00-1000-100-downloads/releases/1.4.2/patch.binThen make the bucket the resource’s origin. Open the resource’s settings (the gear icon on its row) and set the Source Server (Origin) block:
| Setting | Value |
|---|---|
| Origin type | S3 bucket |
| Provider | Melbicom S3 storage |
| Bucket | The downloads bucket |
Click Save. No credentials are typed: on save the CDN creates its own read-only key for the bucket, so the bucket stays private.
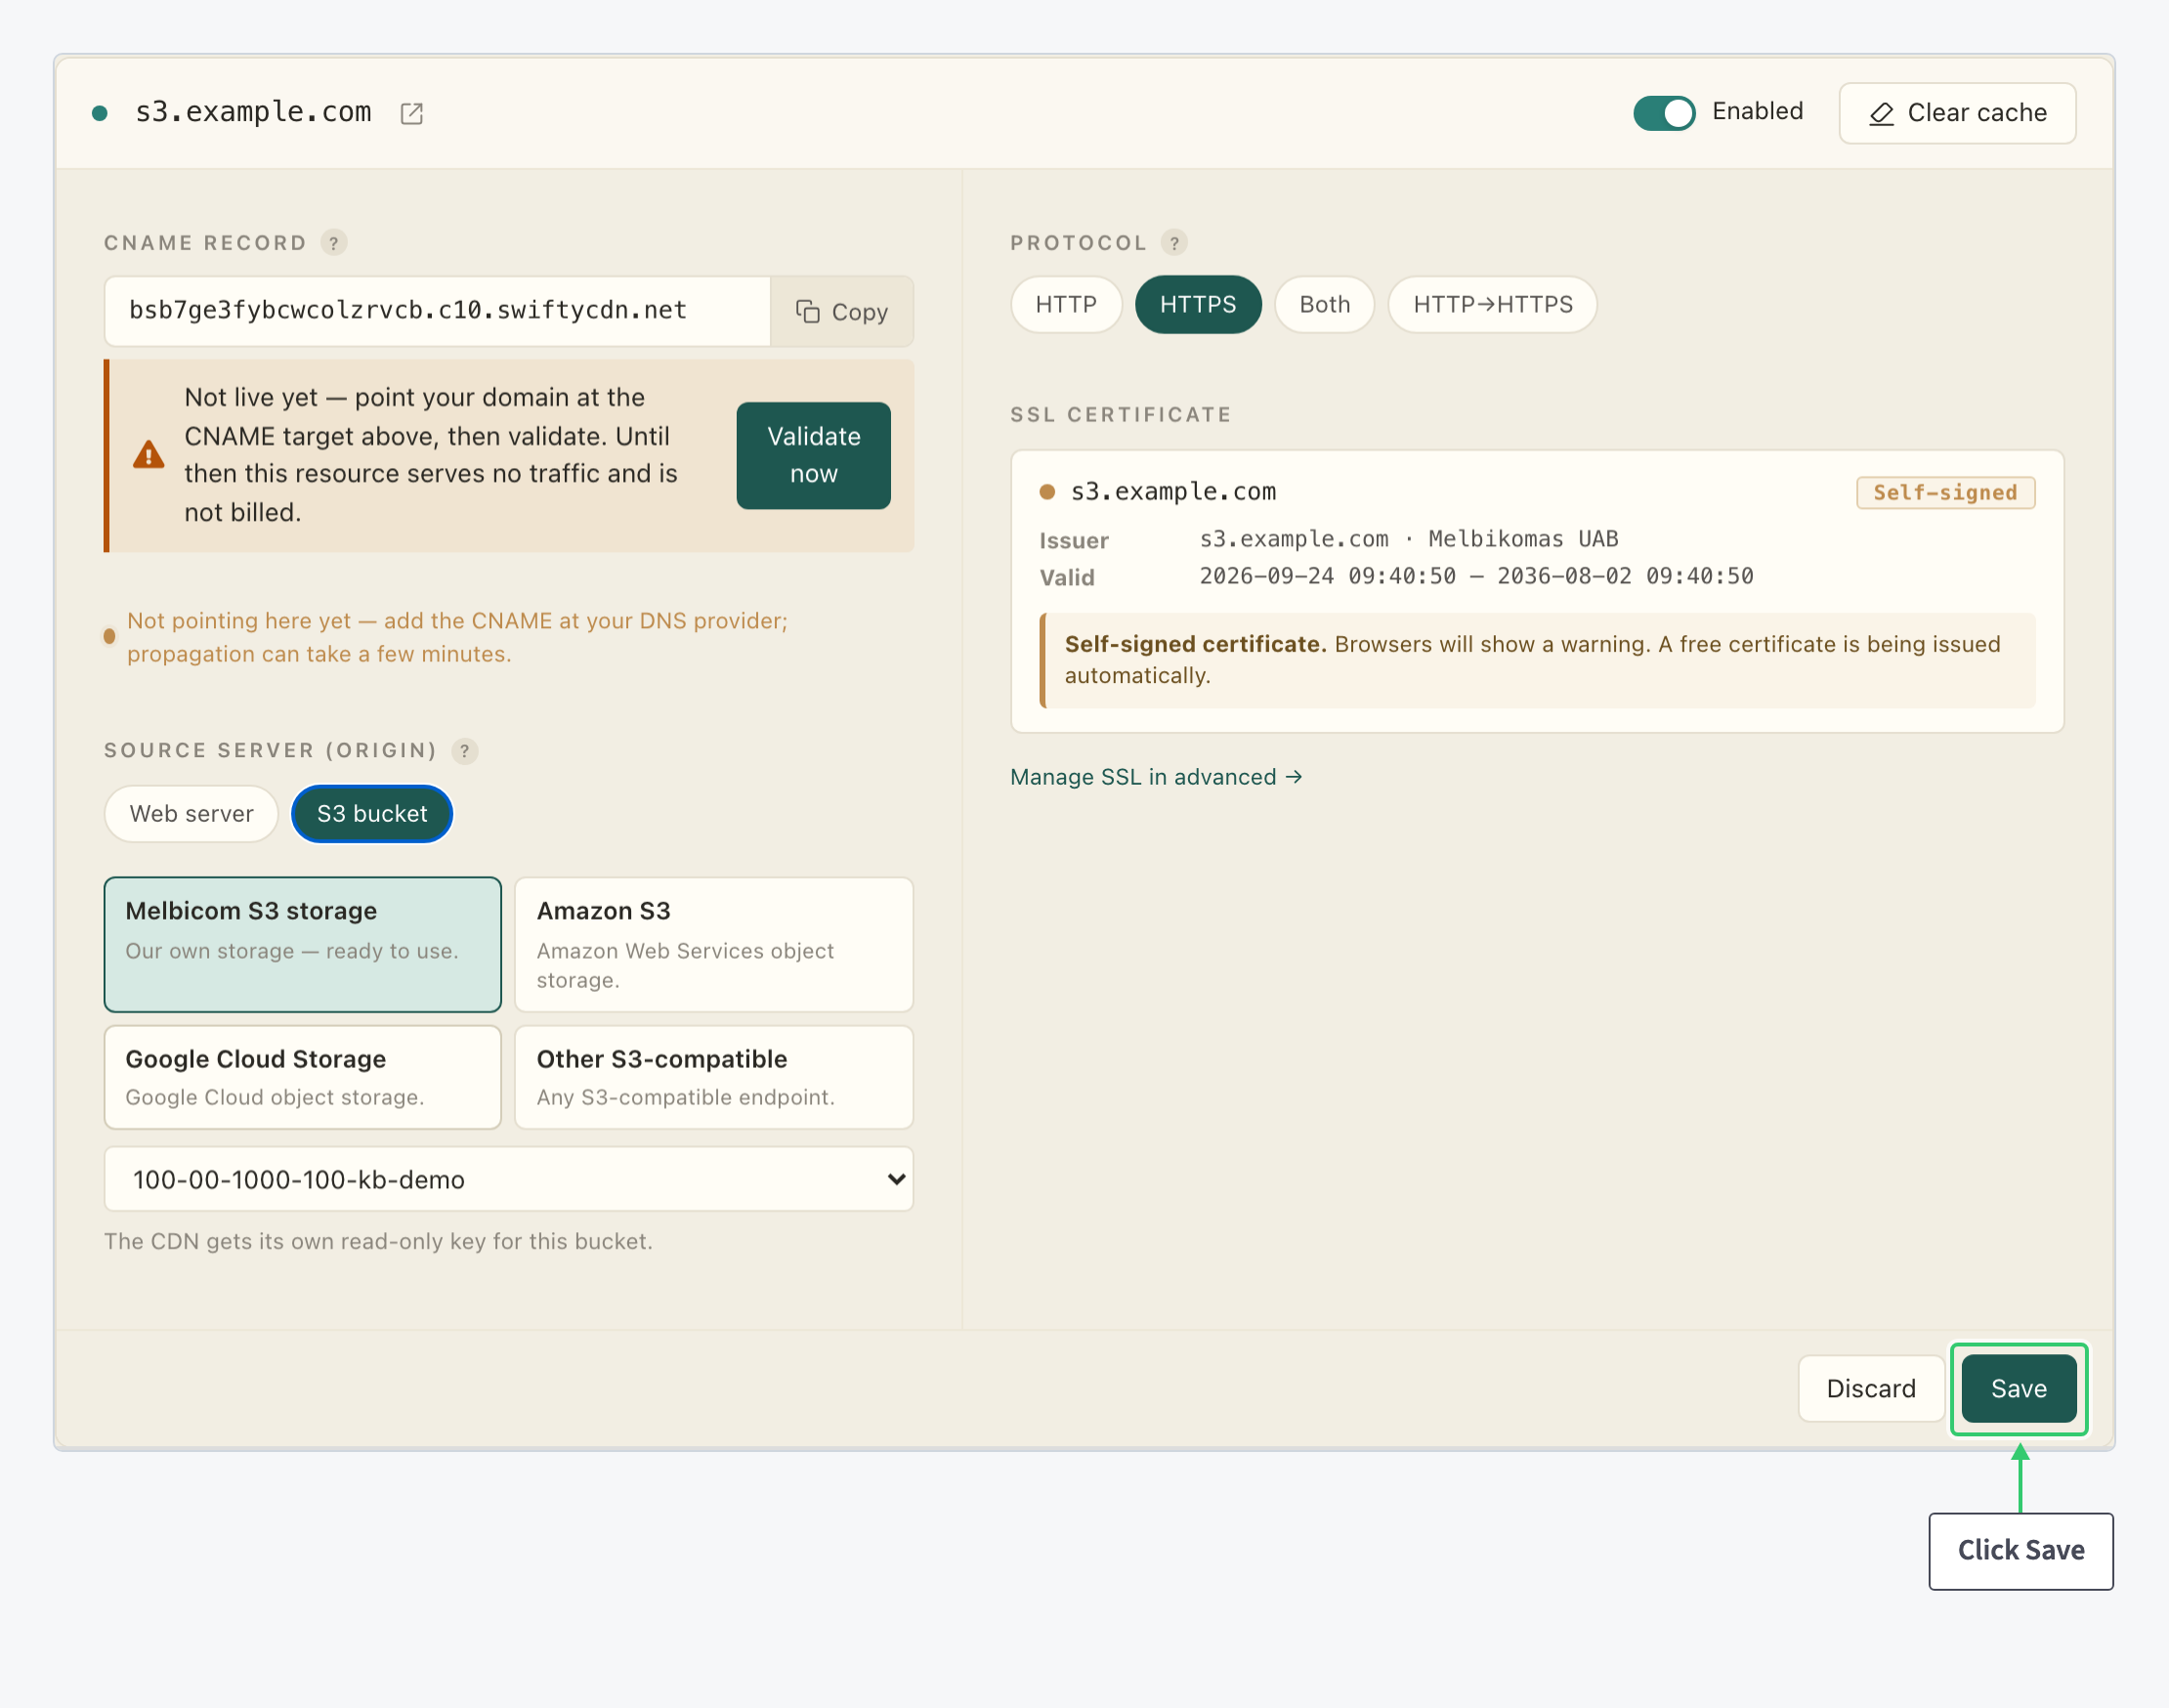
Object keys become URL paths: the build above is served at https://downloads.example.com/releases/1.4.2/patch.bin. A URL that names a prefix instead of an object returns 403, so the launcher links to full keys.
For builds that must never be altered after shipping, create the bucket with Object Lock and a retention period. An object under retention cannot be overwritten or deleted by anyone until the period expires, which turns the versioned-filename convention into a guarantee (Create a Melbicom S3 Bucket with Object Lock).
The origin switch and the URL mapping rules are in Serve a Melbicom S3 Bucket through Your CDN; the client setup is in Install and Configure the MinIO Client for Melbicom S3. With a web server of your own instead, skip this step, keep the Web server origin type, and add Step 5’s backup origin; every other step applies to both.
Step 2: Give Patch Files a Long-Lived Cache Rule
The cache follows the panel’s defaults until you set your own rules, and the place to set them is the Cache Valid editor: a list of HTTP status codes the CDN may cache, each with a fixed duration you choose. In the Resources table of your package, click the gear icon (Edit resource settings) on the resource’s row, then click Advanced settings. In the Cache & Compression section, four collapsed rows sit with a status pill each: Gzip, Brotli, Cache Valid and Cache Use Stale. Click Cache Valid to expand its editor:
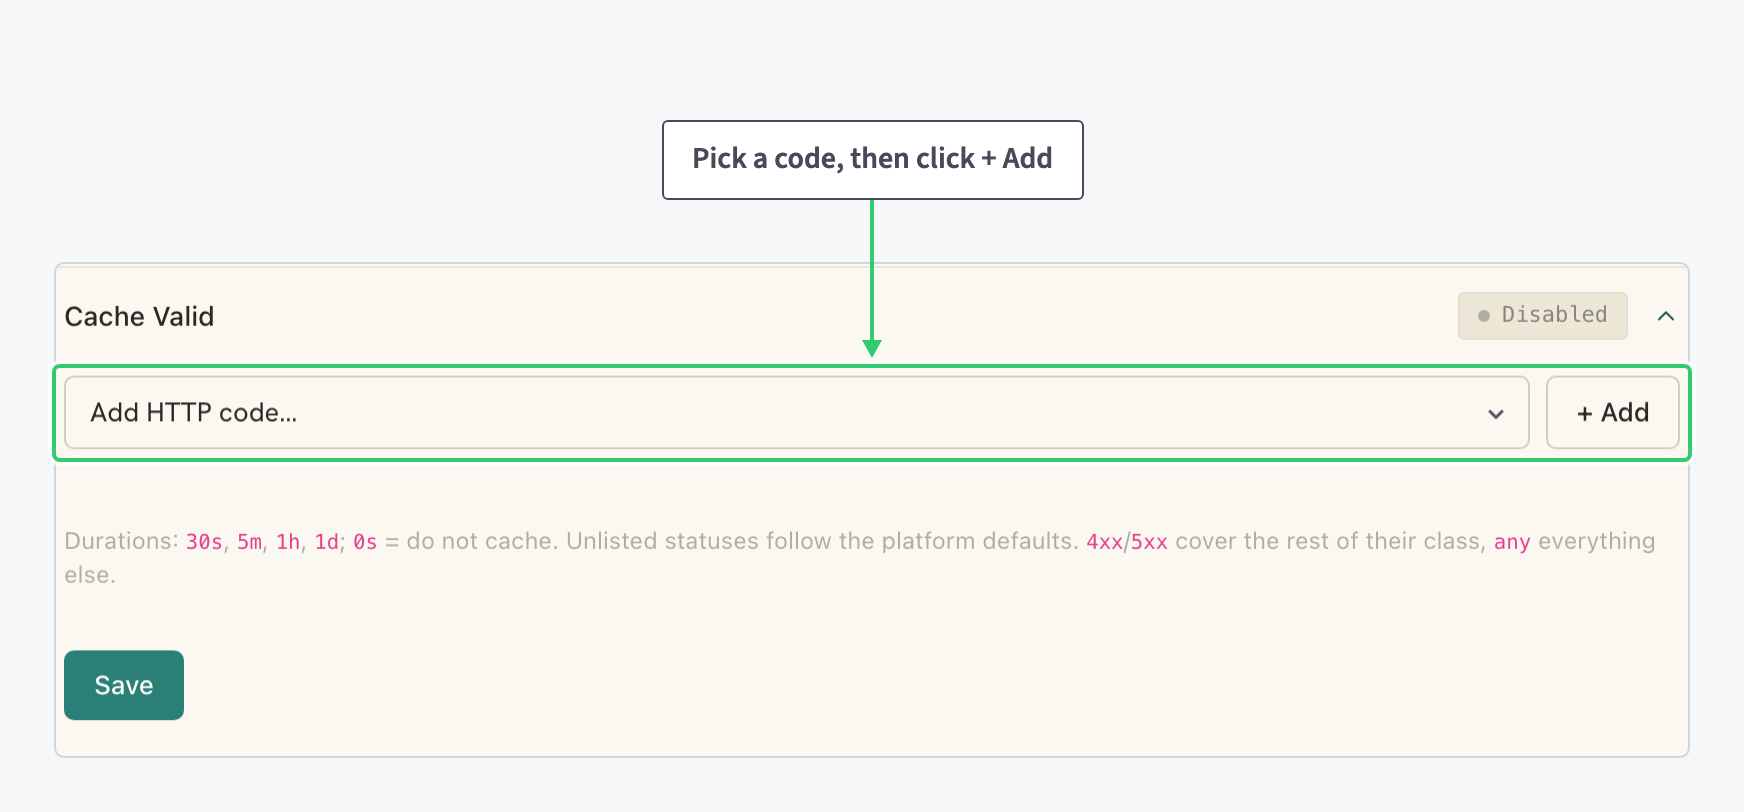
There is no on/off toggle here; the rules you build are the whole configuration. Pick a status code in the Add HTTP code select and click + Add: a rule row appears with the code, a duration field (placeholder e.g. 10m, 1h, 1d) and a red × that removes the rule. Durations take 30s, 5m, 1h or 1d: seconds, minutes, hours and days. For a downloads resource, two rules carry the architecture:
| Code | Duration | Why |
|---|---|---|
200 | 1d | A shipped patch never changes, so the edge can hold it a full day per copy and refill with a single miss the next. |
404 | 5m | Clients polling a not-yet-published path stop reaching your origin, and the file appears minutes after you publish it. |
Staged rules look like this, one duration field per code. The screenshot carries the caching tutorial’s example values, 200 at 1h; on a downloads resource, type 1d in the 200 row instead:
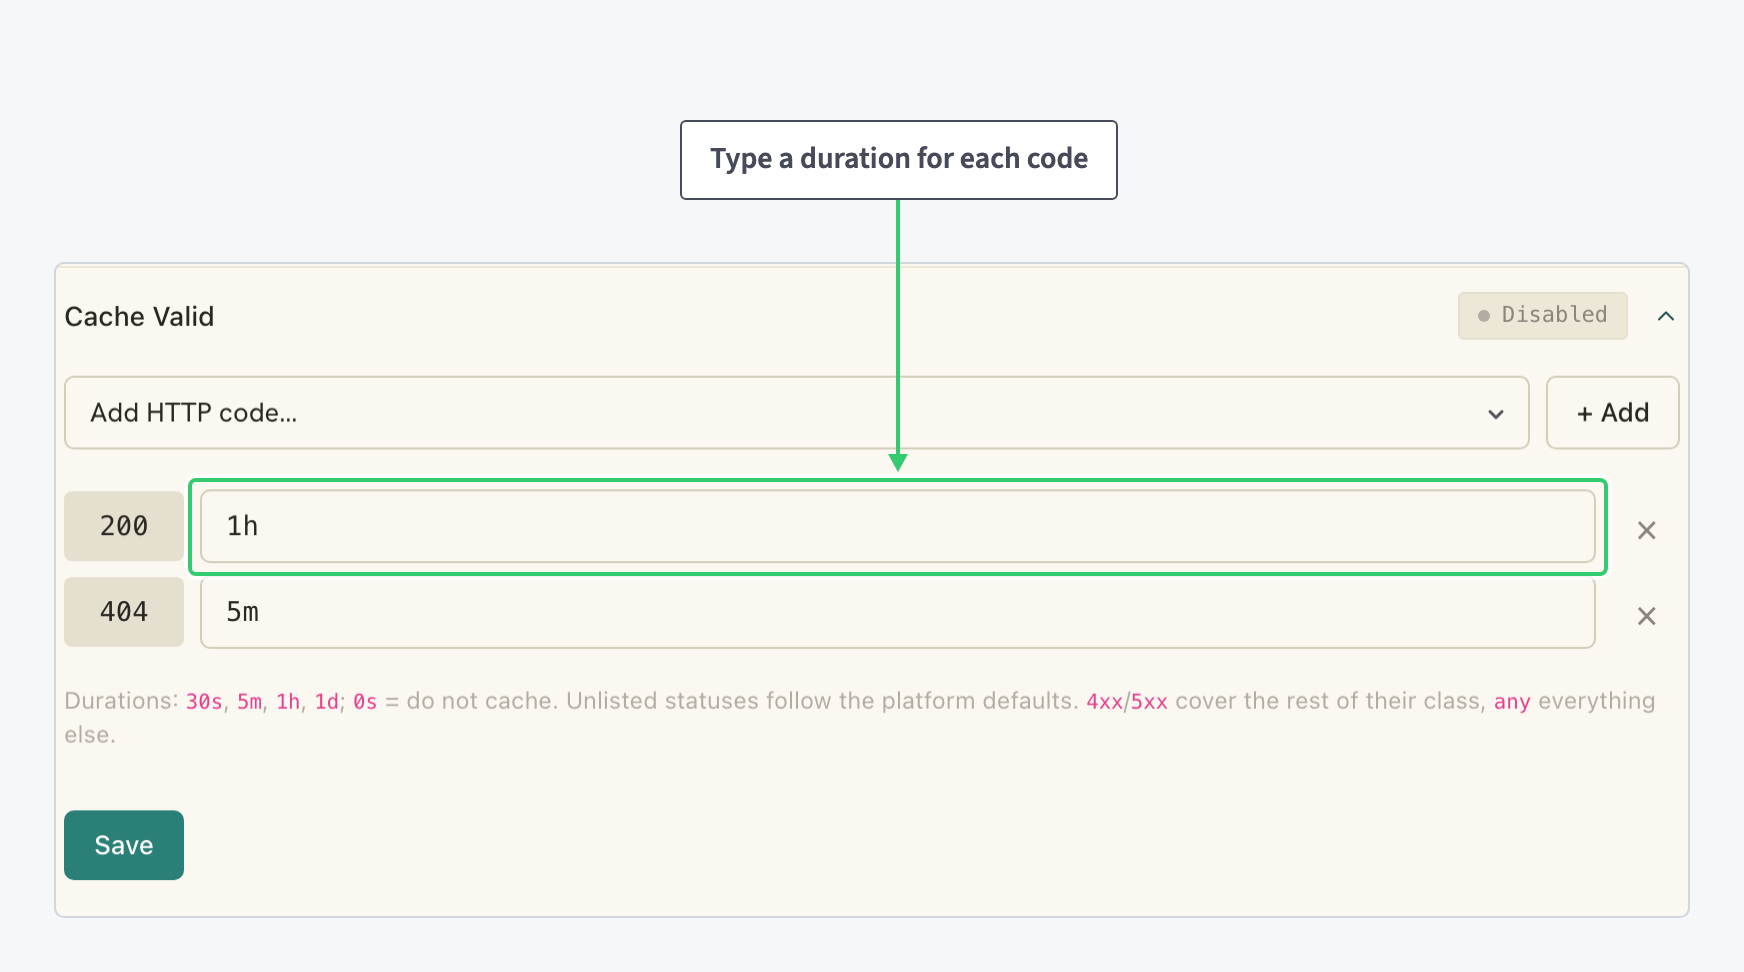
Type the durations and click the section’s Save; each row in this section saves on its own. Ship every build under a versioned filename (patch-1.4.2.bin) and freshness never suffers: a new version is a new URL, cached from its first request.
If you must re-ship a file under the same name, purge it: click the eraser icon (Clear cache) on the resource’s row and type the file’s relative path. Full detail: Purge a URL or Your Entire CDN Cache. The editor walkthrough is in Control How Your CDN Caches Content.
Step 3: Leave the Archives Uncompressed
The Gzip and Brotli rows sit right next to Cache Valid, and for a downloads resource the right choice is to leave them Disabled. Both exist for text-like responses (HTML, CSS, JS, JSON): Gzip compresses them before sending, cutting bandwidth at a small CPU cost, and Brotli offers a better compression ratio that newer browsers prefer when both are enabled. Game archives are the opposite of text-like: they ship already compressed, so running them through another encoder spends CPU on bytes that will not shrink.
If the same resource also serves a launcher page or JSON manifests, give those paths their own location: on the Origins tab of the same advanced view, click + Add a Location, enter the path prefix, for example /launcher/, add an optional description, and click Save. More specific prefixes win over the catch-all /, and the new location’s card carries its own Cache & Compression group, so compression switches on for just that path and never applies to the archives. Every field of both editors is covered in Enable Gzip and Brotli Compression on Your CDN; locations are covered in Route and Configure a Specific URL Path on Your CDN.
Step 4: Concentrate Cache Misses with Origin Shield
When a patch is released, every edge that does not hold the file yet requests it at the same moment, and each of those misses is a multi-gigabyte fetch. The Origin Shield row in the Connection area of the same advanced General page, under the Protocol selector, is built for exactly this: it routes cache misses through a shared edge node, which removes redundant origin hits and protects your origin from direct traffic.
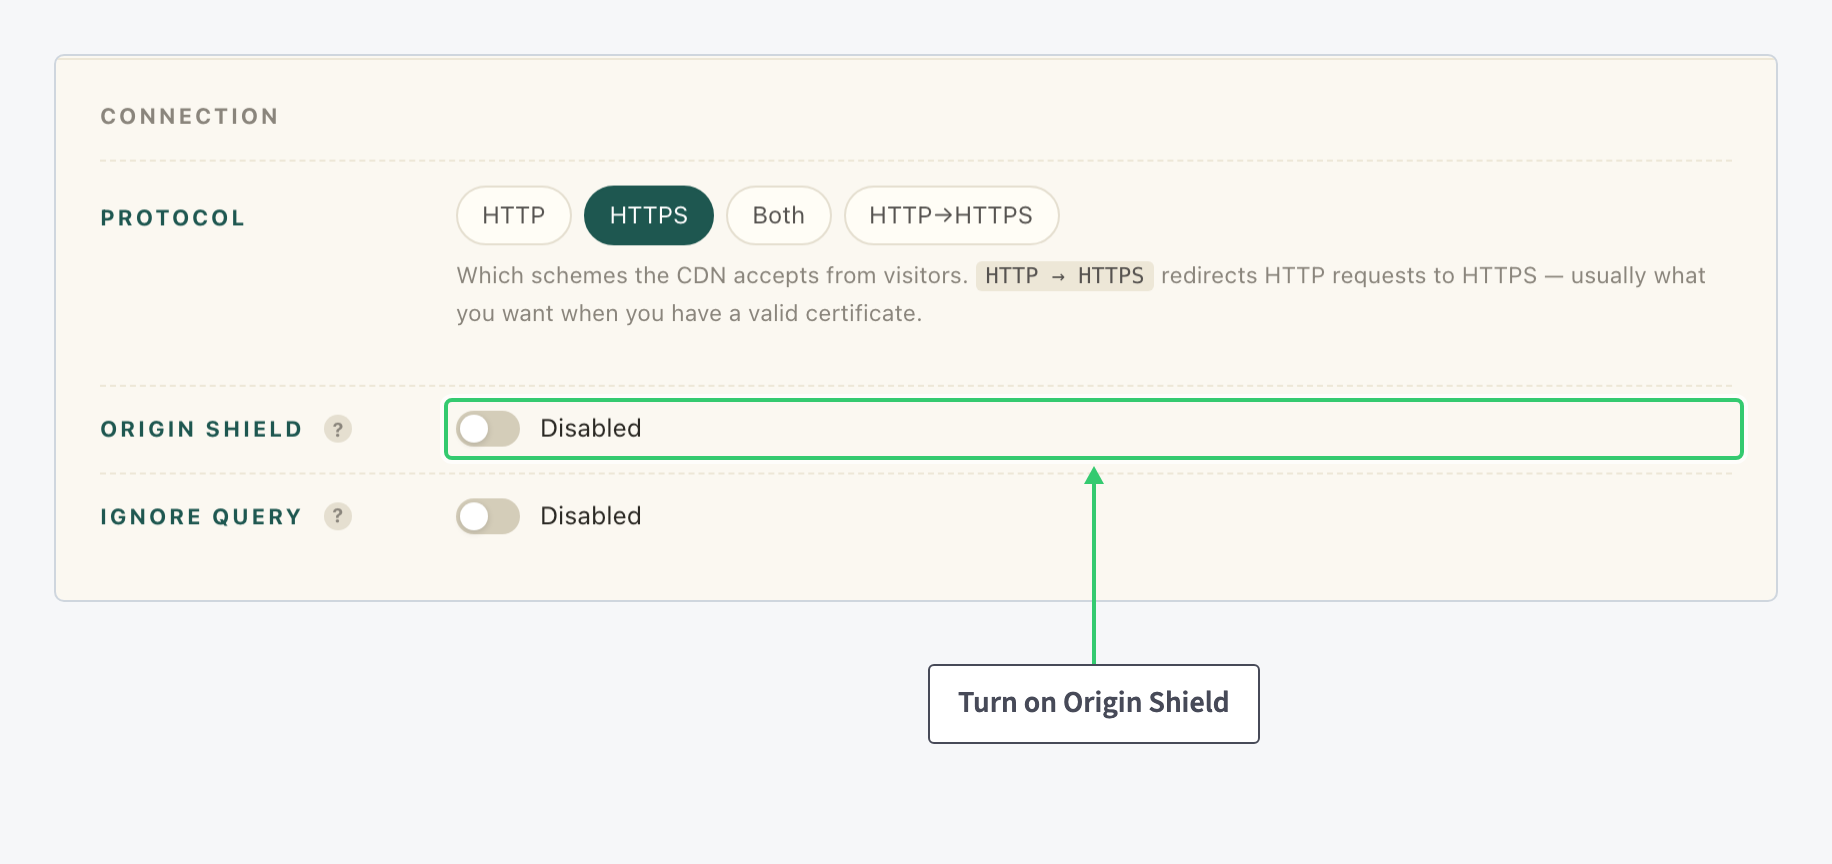
Click the toggle, then apply it with the resource form’s Save bar; this row belongs to the main form, while the feature rows from Steps 2 and 3 save individually. With the shield on, release-day misses funnel through one shared layer instead of every edge fetching the same archive from your origin separately.
Step 5: Add a Backup Origin for Release Day
This step applies to a web-server origin; a bucket origin has no second server to add. One origin server behind a worldwide launch is a single point of failure. Open the Origins tab of the advanced view and find the upstream named default under Upstreams: it holds your origin as its only active server.
Hover over the card and click the pencil (Edit) that appears in its top right corner. In the Edit upstream dialog, fill the add-server form at the bottom of the Servers section:
| Setting | Value |
|---|---|
| Address | Your second server, e.g. origin-2.example.com (an IPv4 address or a domain name) |
| Port | Leave blank: it defaults to 443 for HTTPS and 80 for HTTP |
| Role | Backup |
The Role dropdown is the failover switch: Active servers share traffic round-robin, Backup servers take over only when every active server is down, and Disabled servers receive no traffic. Click + Add Server; the entry joins the server list:
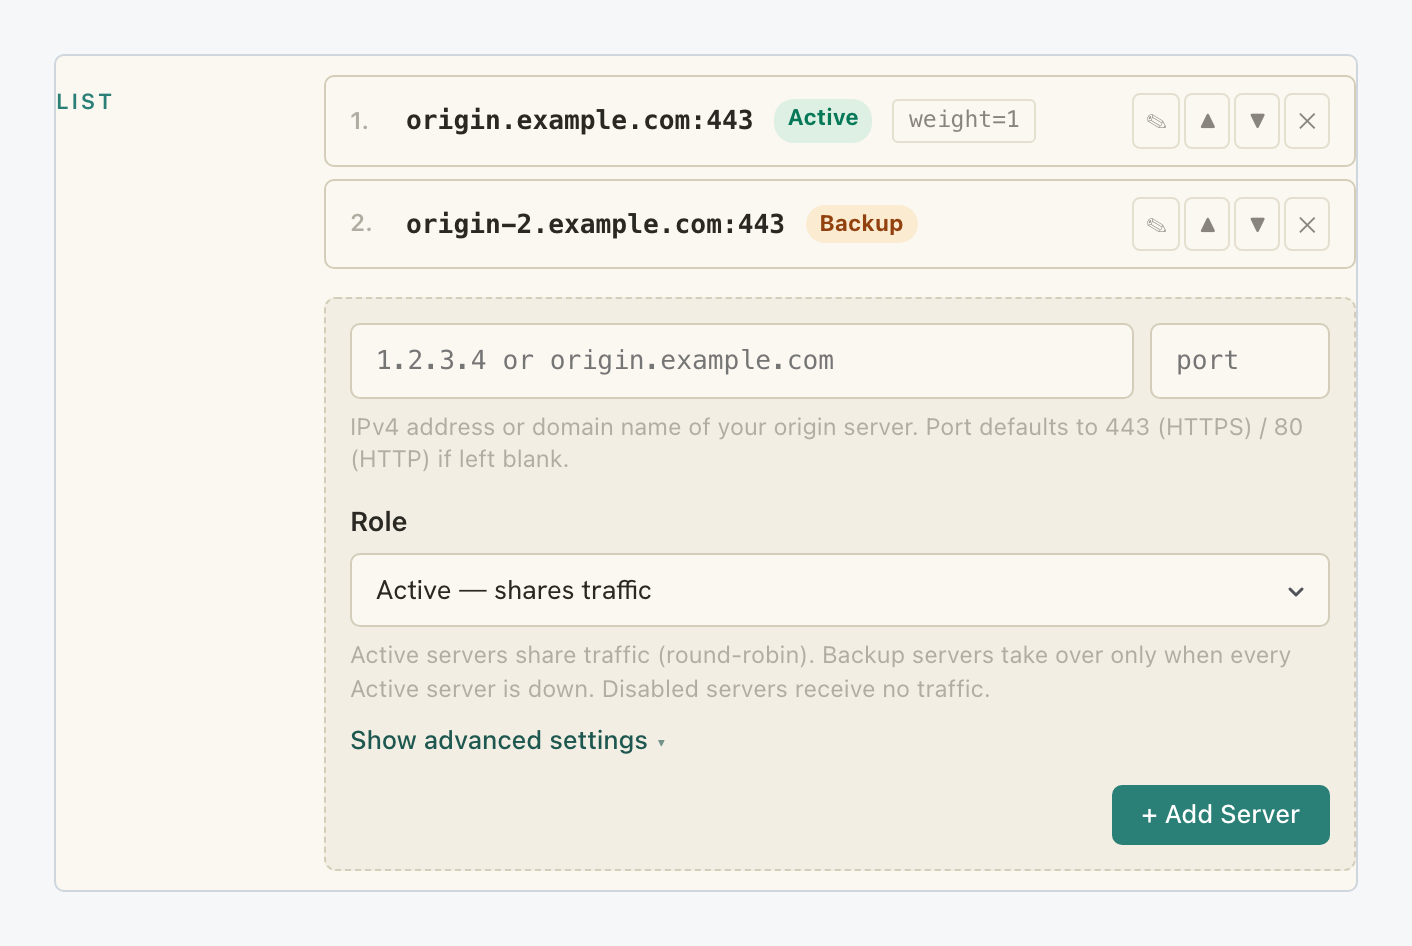
Click Save in the dialog footer to apply the pool; Cancel leaves the upstream as it was. If your origin fails mid-rollout, the CDN moves its misses to the backup with no DNS change and nothing visible to players. Full detail, including weights and health checks: Add Multiple Origins and Failover to Your CDN.
Step 6: Require Signed Links Where Entitlement Matters
Public patches can stay open, but a paid expansion or a pre-release build should not download for anyone holding the URL. In the Locations panel of the same Origins tab, click the row of the location that serves those files to expand its card, and expand the Secure Link row in the Security group at the bottom of the card:
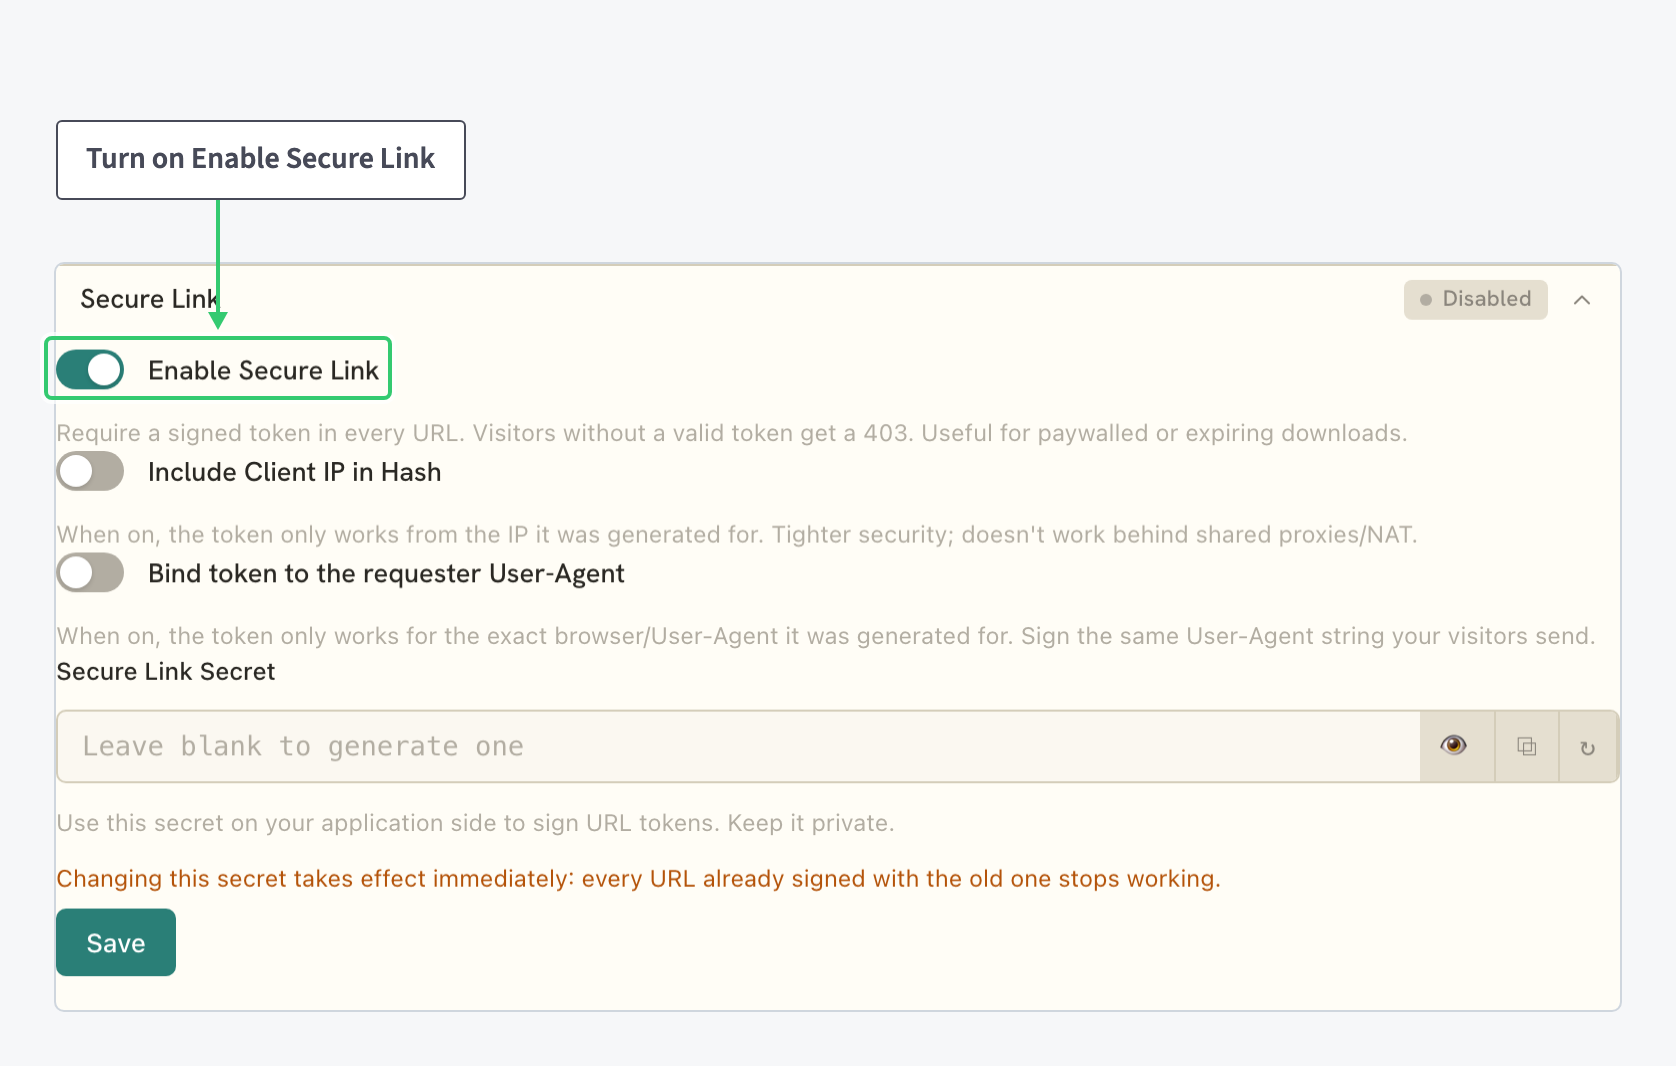
Enable Secure Link makes every URL under the location require a signed token: visitors without a valid one get a 403, exactly the treatment paywalled or expiring downloads require. Include Client IP in Hash locks each token to the IP it was generated for; it fails behind shared proxies and NAT, so leave it off for a general player base. Switch on the requirement and click the section’s Save.
Generate the signed links on your side, typically in the store or launcher backend that issues the download URLs. Copy the Secure Link Secret from the same editor into that application: Secure Link validates tokens, your application creates them and decides their expiry. The feature’s settings are covered in Protect Content with Secure Links. To keep entitled builds under their own prefix in the first place, add a location for them the same way as the launcher path in Step 3: click + Add a Location on this tab, enter /premium/, and click Save; more specific prefixes win over /.
Step 7: Watch the Rollout in the Country Statistics
A worldwide release needs a worldwide view. In the Resources table, click the chart icon (View statistics) on the resource’s row and scroll to the country panels: a Traffic by Country treemap of shares, and the Top countries table with per-country traffic, requests, cache hit rate and status codes, each country carrying its zone as a pill:
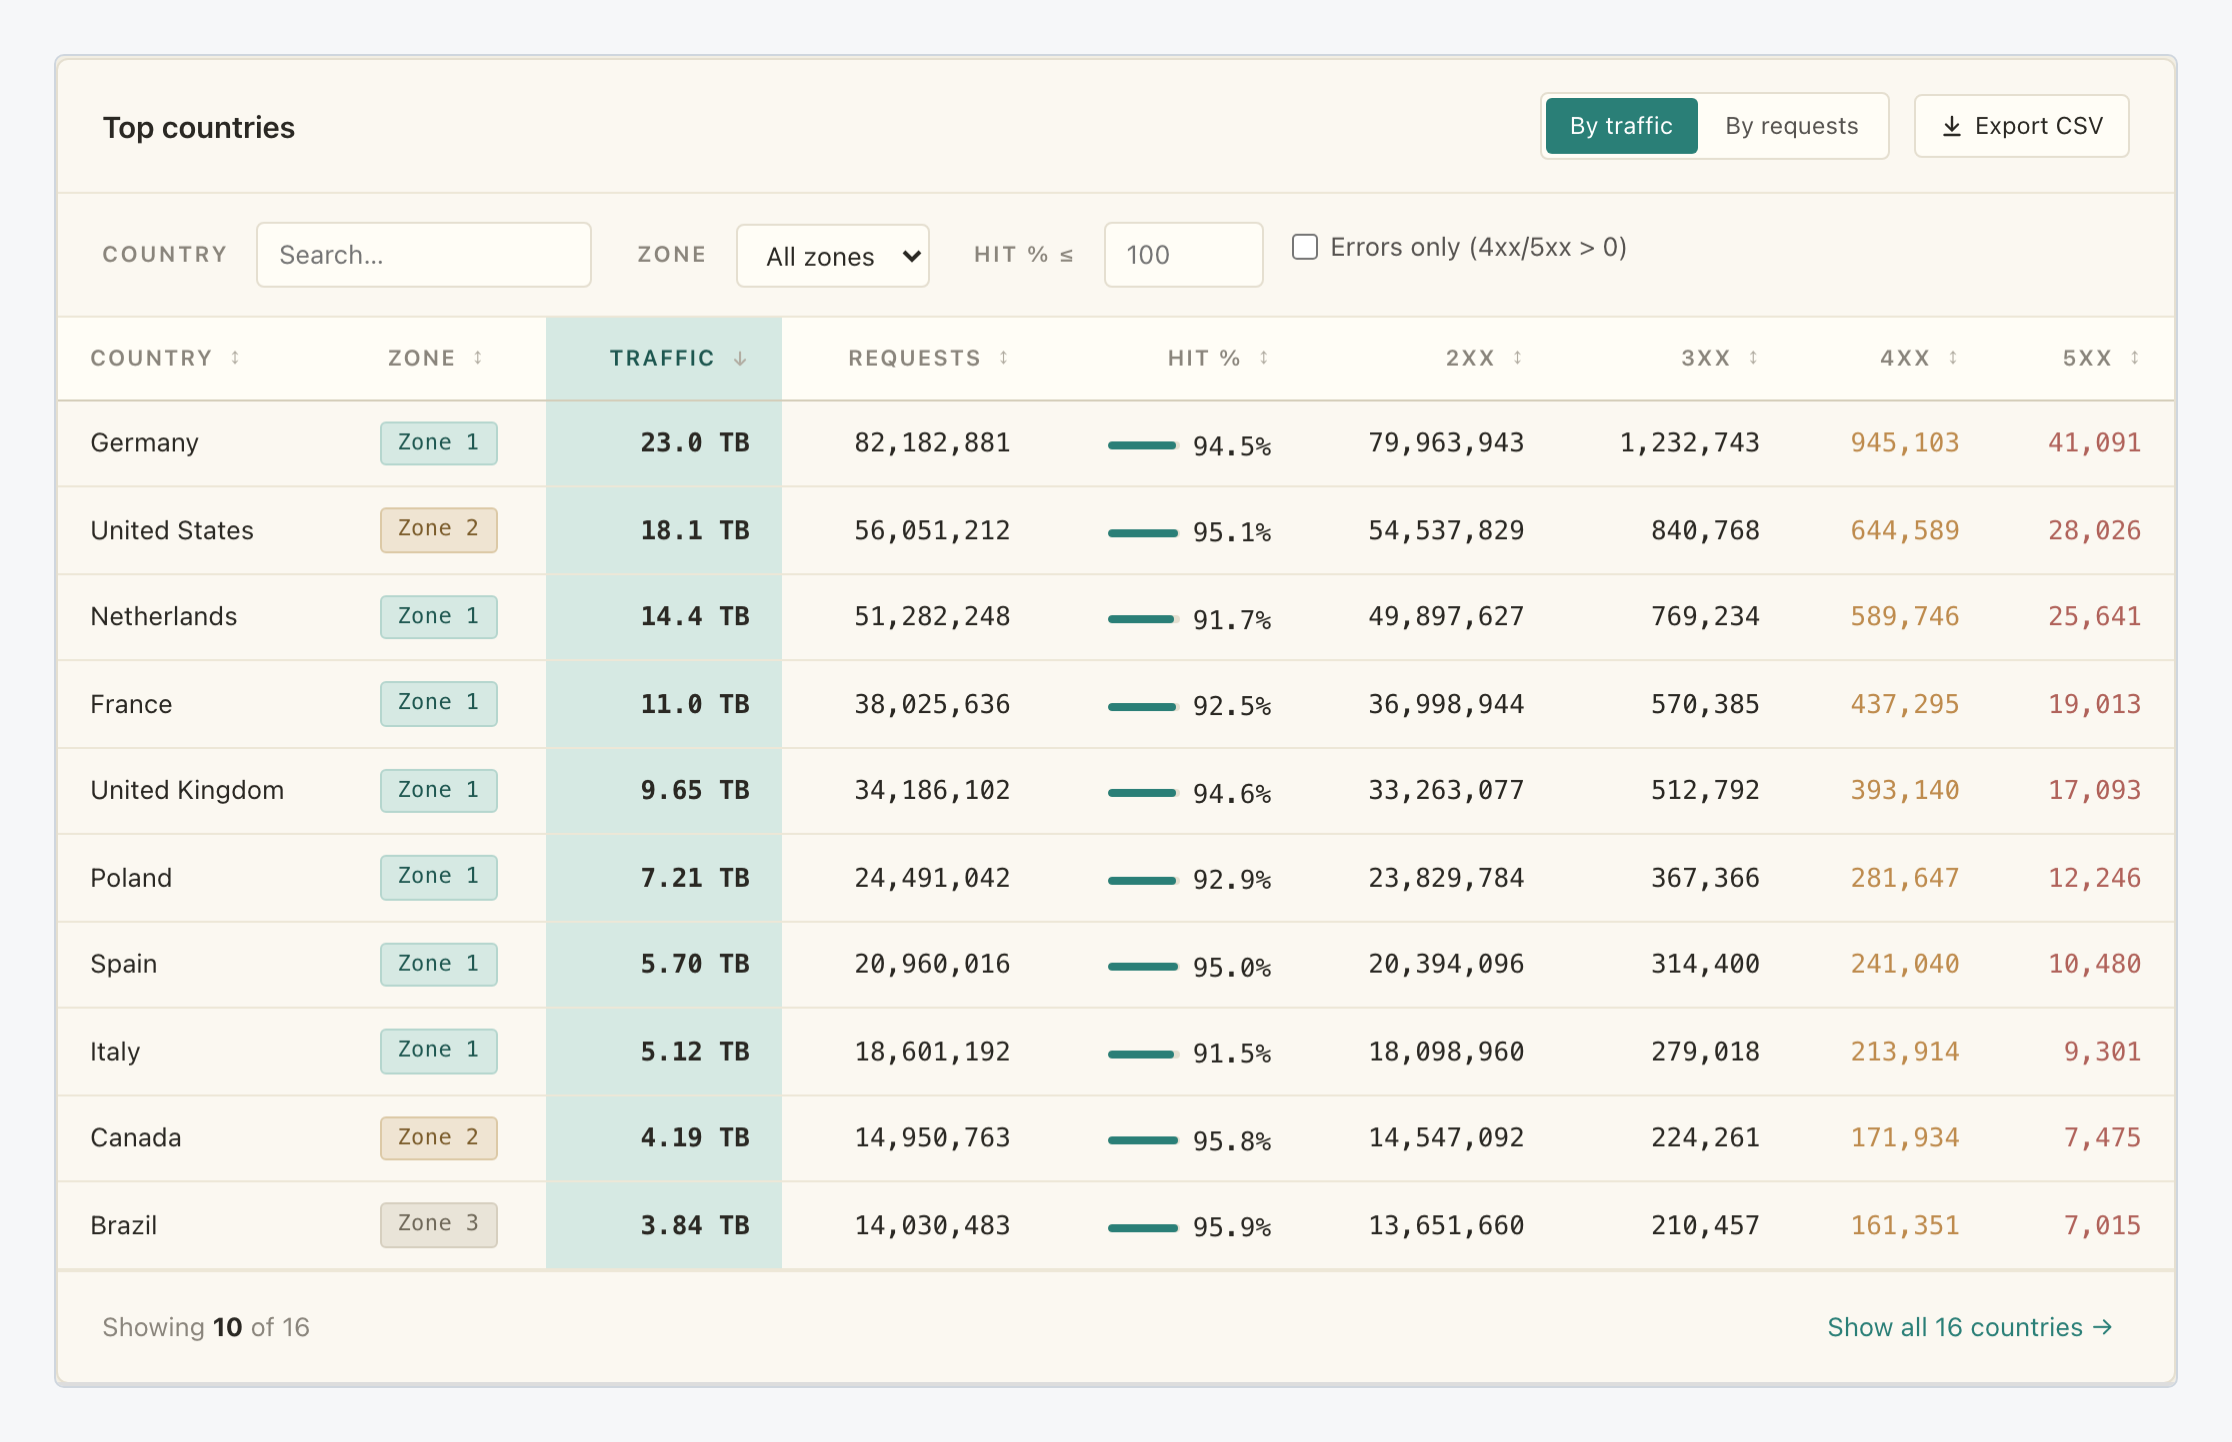
During a rollout this table answers the launch-day questions: where the patch is being downloaded (switch between By traffic and By requests), whether the edges are warm (a rising hit rate per country means players download from cache, not from your origin), and where errors cluster (the 4xx and 5xx columns). Export CSV turns the table into the post-launch report. Filtering, sorting and the export are covered in Analyze and Export CDN Traffic by Country; the rest of the statistics view is in Monitor CDN Traffic and Cache Performance.
What You’ve Built
A download path shaped like the workload. Each patch sits in a private bucket, immutable under Object Lock if you chose it, and leaves the storage only a few times; it serves from the edge everywhere else, held there a full day per copy.
Release-day misses funnel through Origin Shield, a backup origin waits behind the active one, entitled builds require a signed token, and the country table shows the rollout as it happens.
The same resource grows with the catalog: new versions cache from their first request because every build ships under a new filename, a text-serving path can opt into compression on its own location card, and when the next title launches, repeat the pattern with a second resource.