
Five minutes of hands-on work separate an empty CDN package from a hostname served at the edge: create a resource, add one CNAME record at your DNS provider, let the free certificate issue, and verify. After that, DNS propagation runs on its own schedule, as with any DNS change, and the certificate issues once the CNAME validates.
Each step below is the condensed version of a tutorial that covers every field. Read this guide to go live; follow the links when you want the detail. The four stages:

Prerequisites
- An active CDN package with a free resource slot.
- Access to your domain’s DNS zone, at your registrar or wherever your nameservers are hosted.
- Your origin server’s address: the IPv4 address or domain name of the web server or load balancer the CDN will fetch from.
- Client Area access to the package.
Why one DNS record is enough
- One DNS record is the whole migration: your origin keeps its name and address; the CNAME moves only the public hostname onto the CDN.
- Certificate issuance is automated: the free Let’s Encrypt certificate issues once the CNAME validates, and auto-renews after that.
- Nothing you pick today is final: protocol, certificate and origin are all editable in the resource settings later, without touching DNS again.
Step 1: Create the resource
Open your CDN package and click Add Resource in the top right corner. One wizard collects the four decisions: hostname, protocol, SSL certificate and Source Server (Origin).
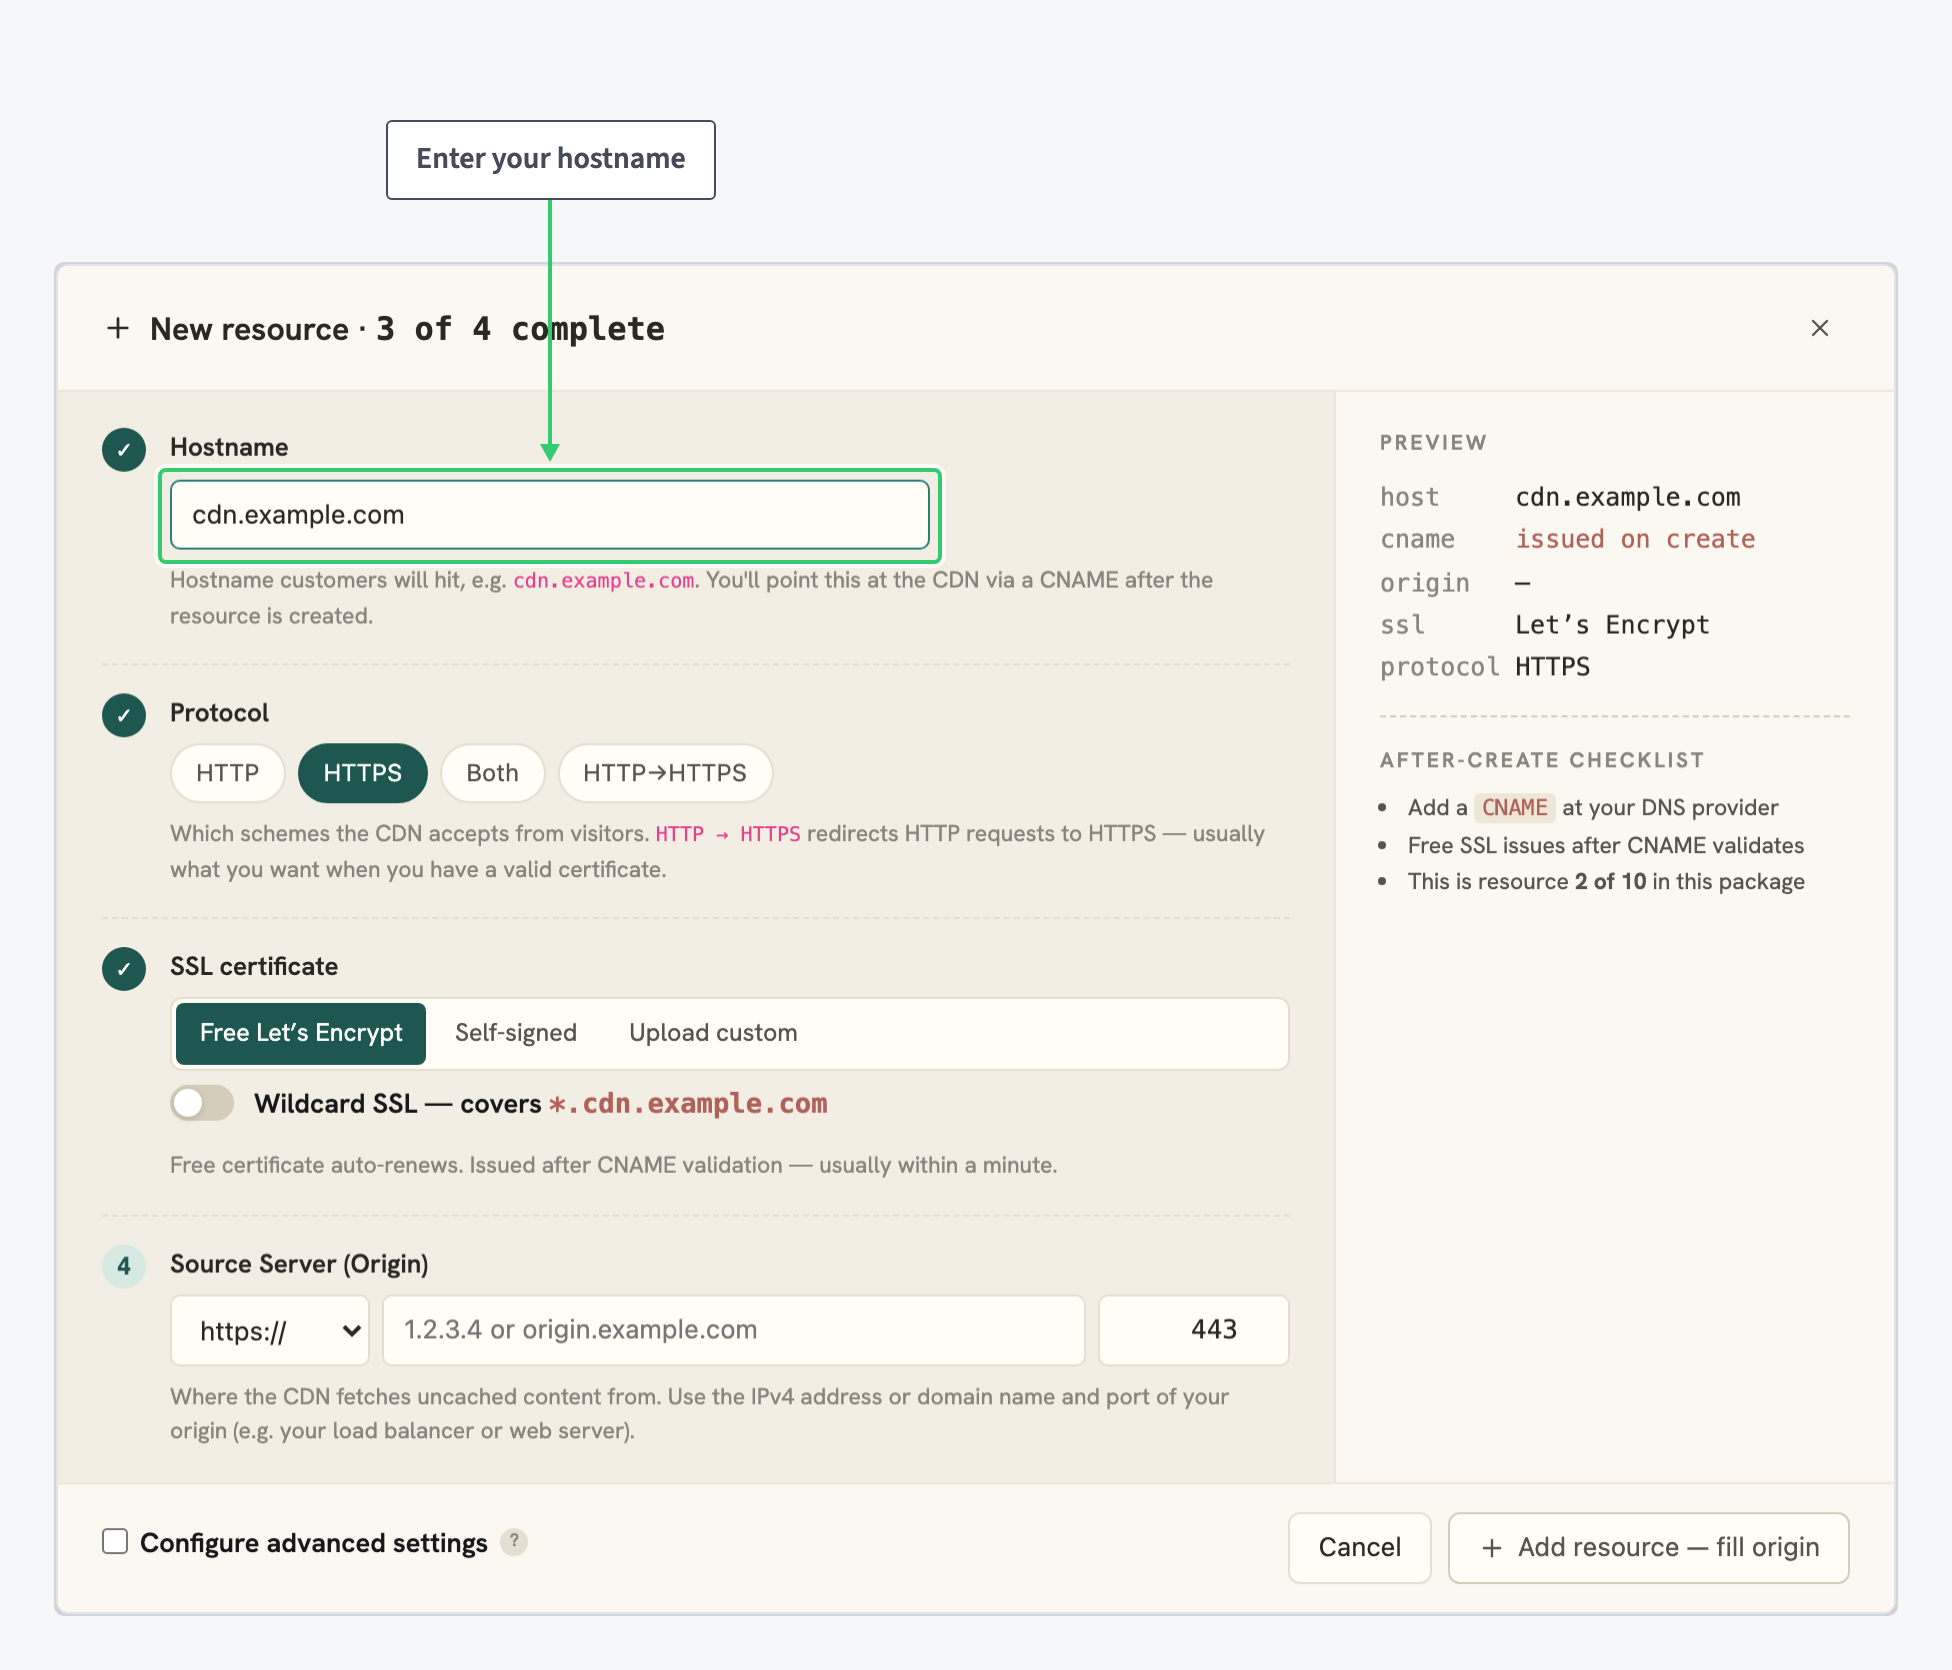
For a quick start, the defaults do most of the work:
| Setting | Value |
|---|---|
| Hostname | The address visitors will use, for example cdn.example.com |
| Protocol | HTTPS. Revisit it once the certificate is live; Choosing a protocol explains when each option applies. |
| SSL certificate | Free Let’s Encrypt, the default |
| Source Server (Origin) | https://, your origin’s IPv4 address or domain name, port 443 |
When every section shows a check mark, the wizard title reads Ready to submit and the Preview panel recaps your choices next to an after-create checklist:
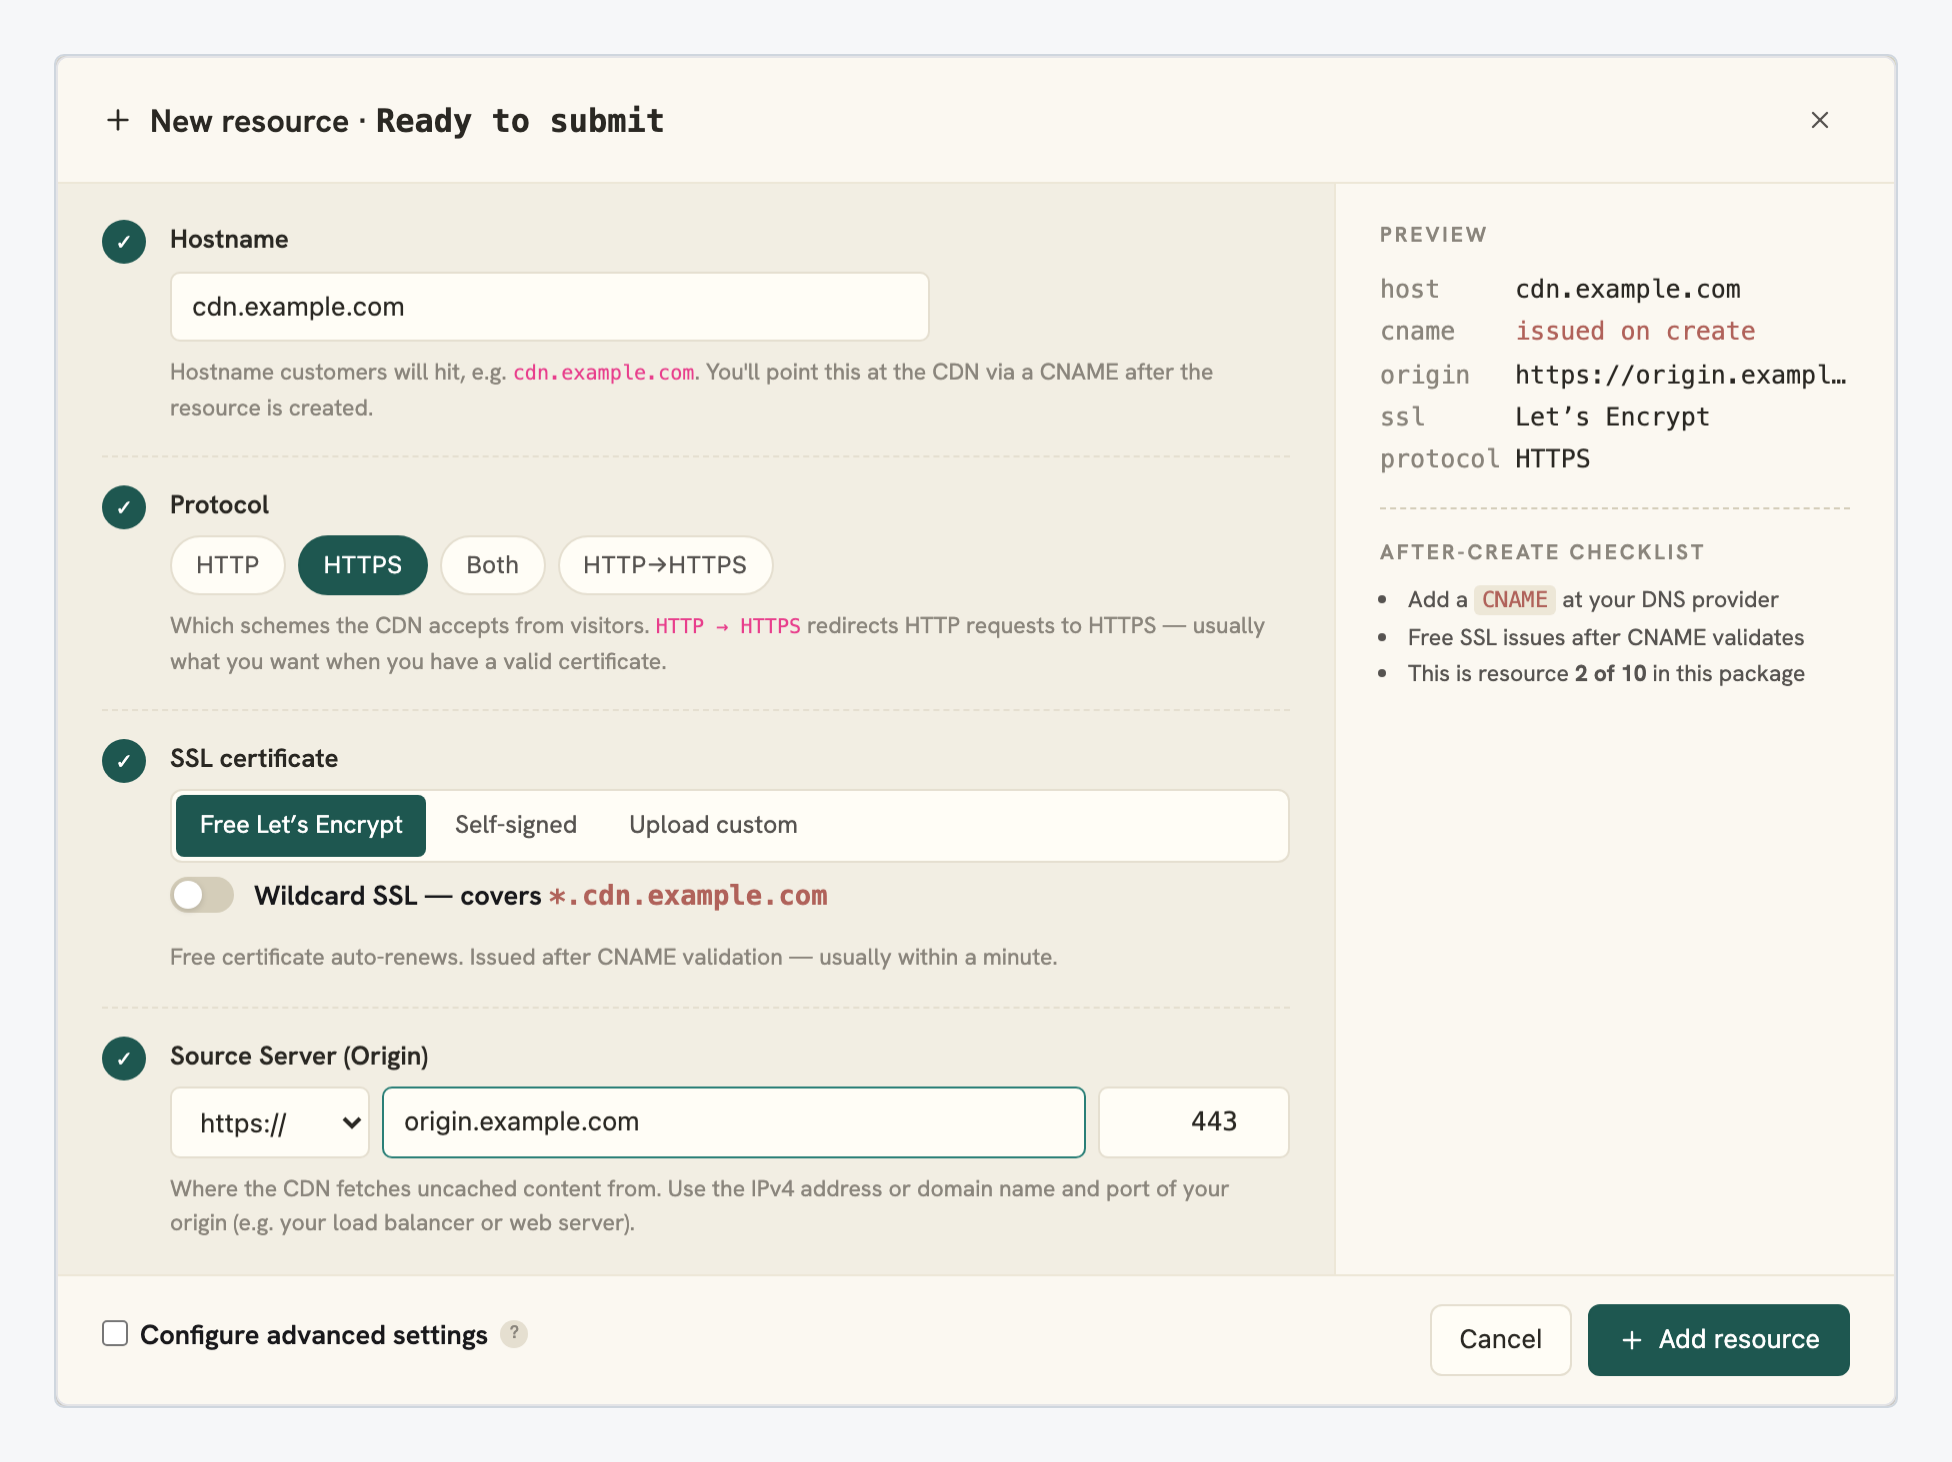
Click Add resource. The checklist already lists the rest of this guide: add a CNAME at your DNS provider, and free SSL issues after the CNAME validates. Full detail: Add your first CDN resource.
Step 2: Add the CNAME at your DNS provider
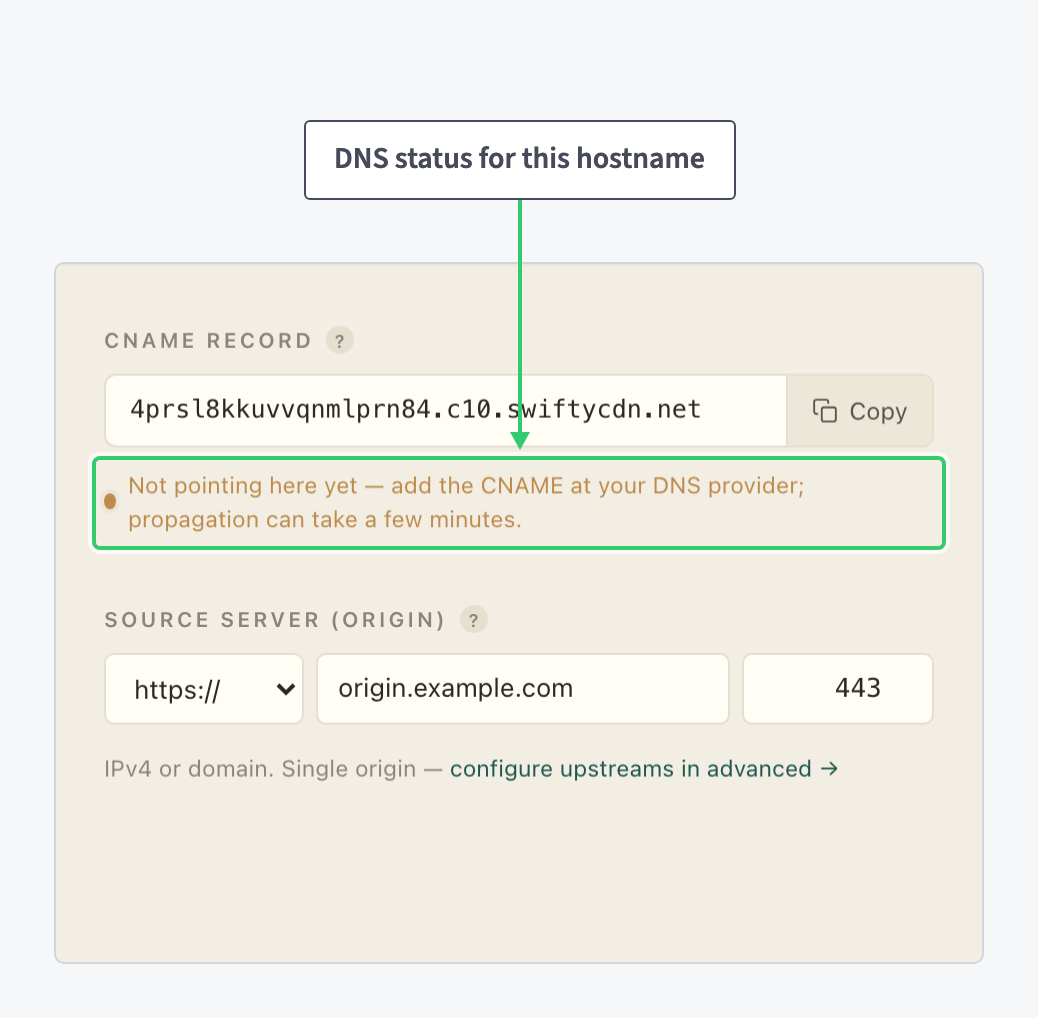
In the package’s resource list, click the gear icon in the Actions column of your new resource. The first field on its General tab is CNAME record: the target hostname the CDN issued for this resource. Click Copy.
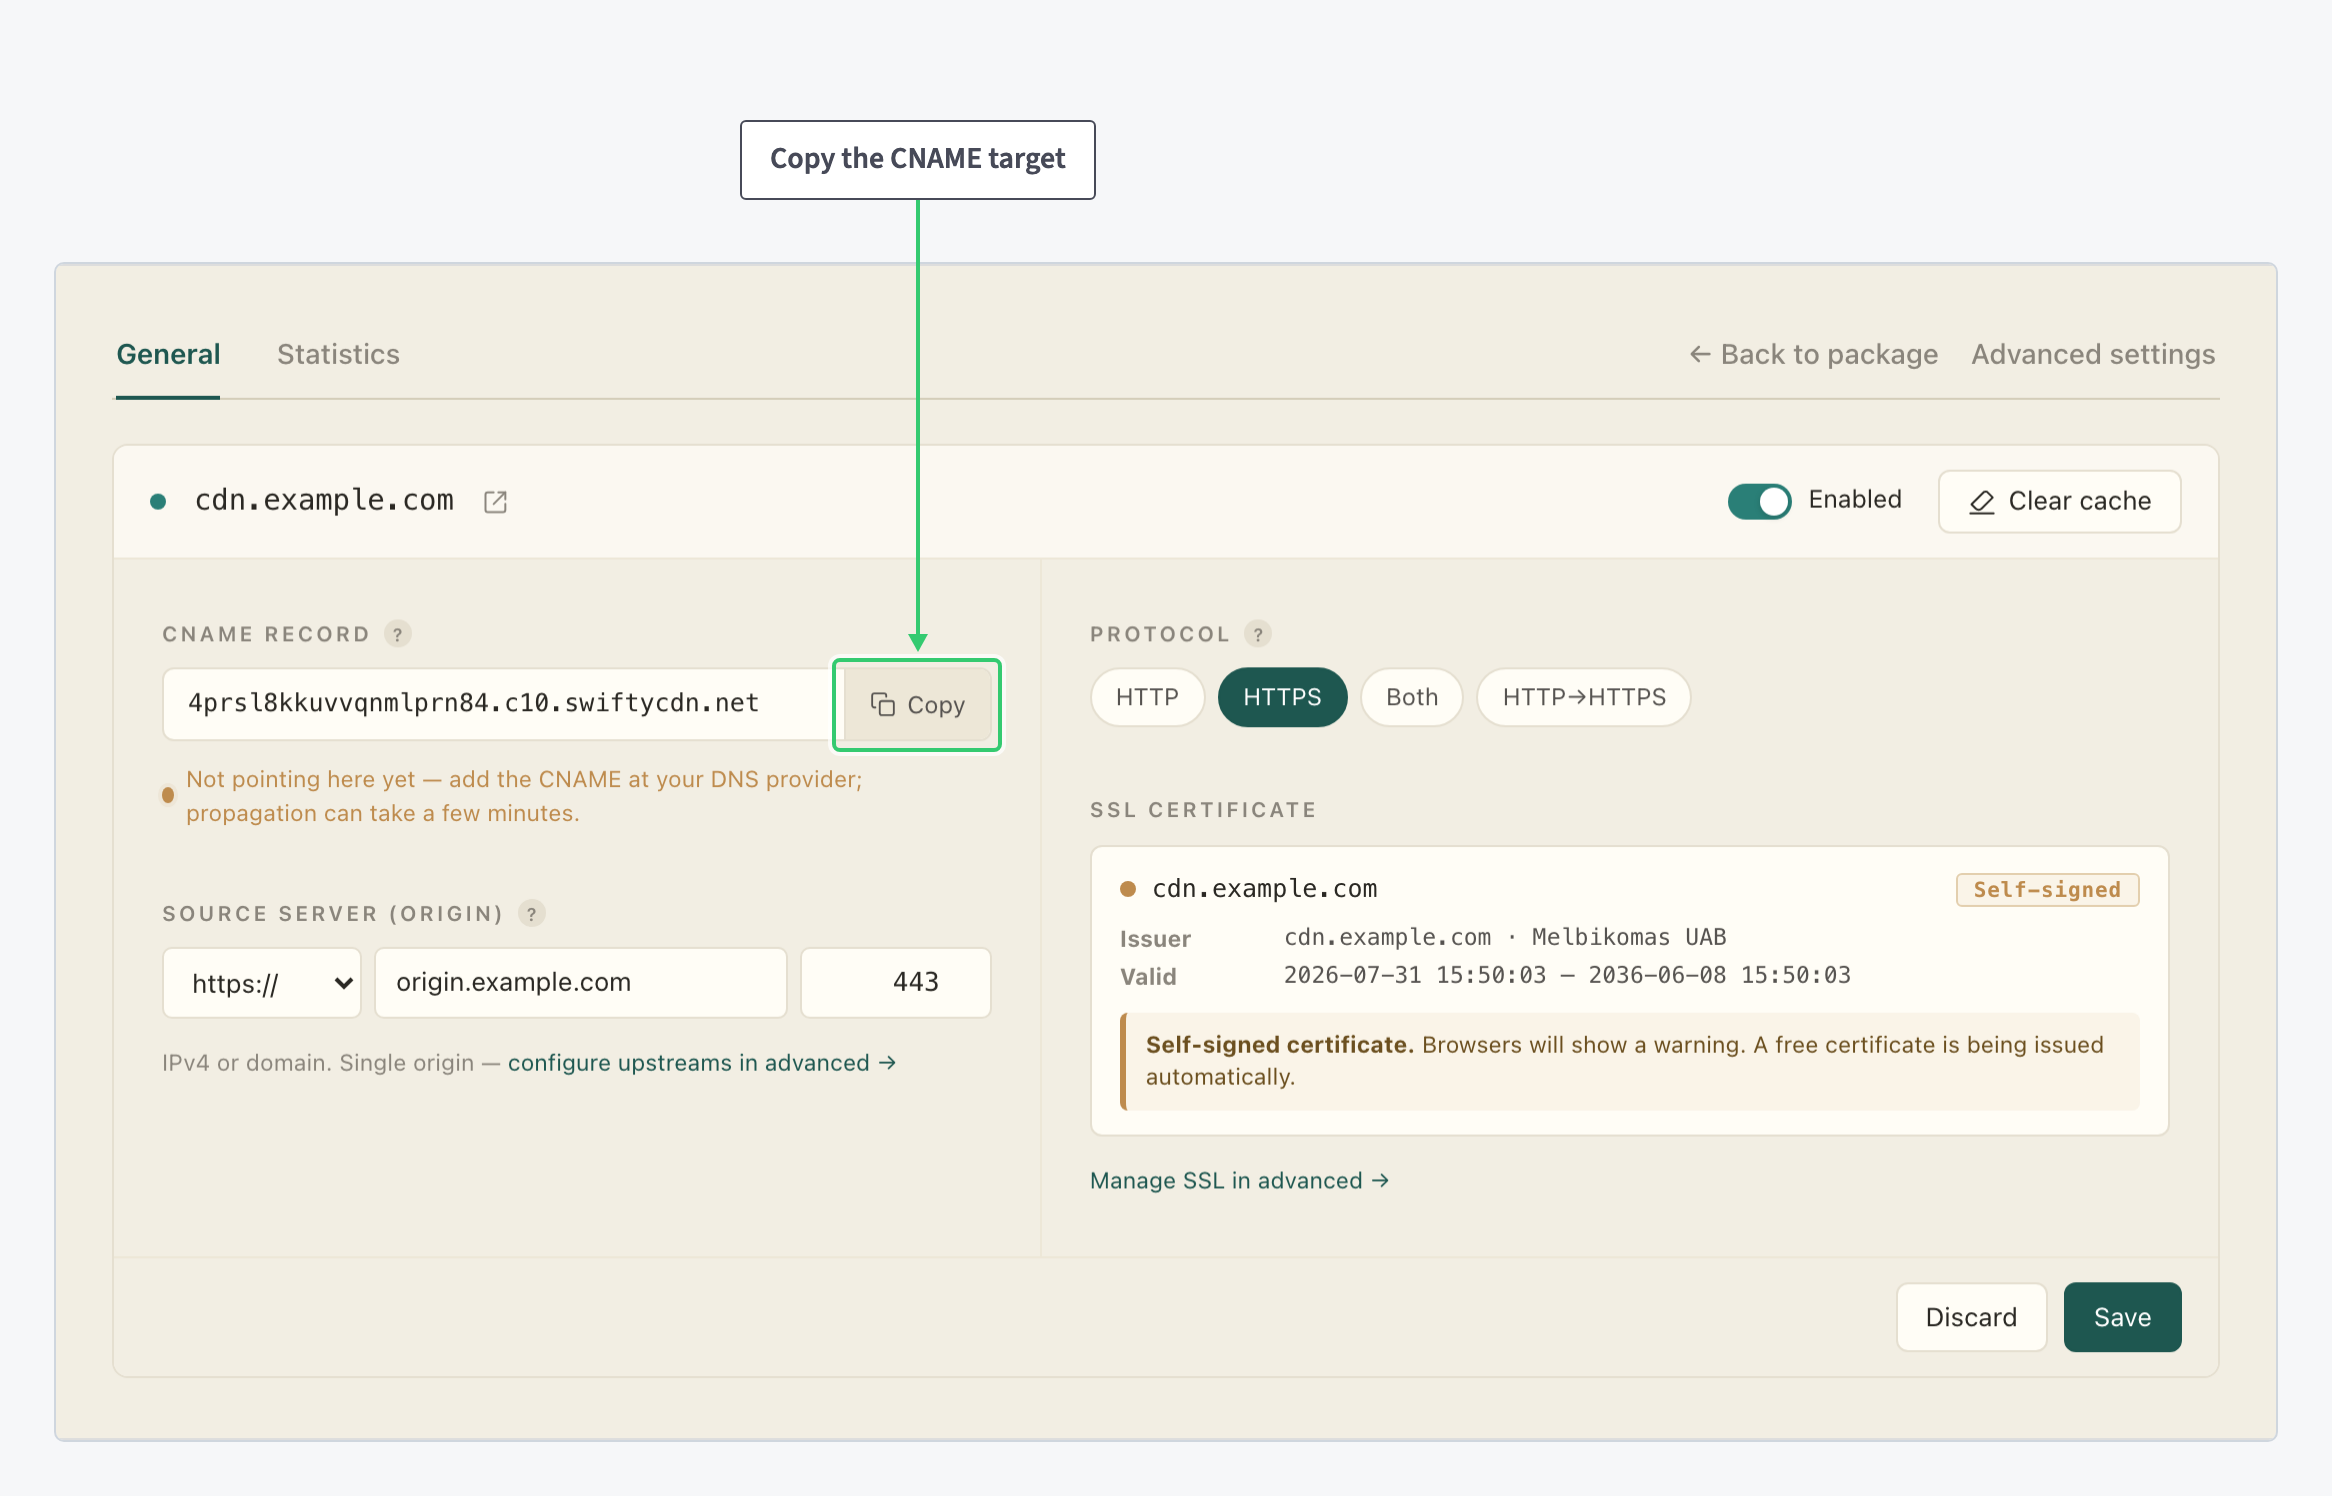
At your DNS provider, open the domain’s zone and add one record:
| Setting | Value |
|---|---|
| Type | CNAME |
| Name (or Host) | The subdomain part of your hostname, for example cdn for cdn.example.com |
| Value (or Target) | The target you copied, for example 4prsl8kkuvvqnmlprn84.c10.swiftycdn.net |
| TTL | The provider default |
If an A or AAAA record already exists for the same name, replace it: a hostname carries one record of this kind, not two. Until the change propagates, the status line under the CNAME record reads Not pointing here yet; propagation can take a few minutes. Full detail: Point your domain at the CDN.
Step 3: Let the certificate issue
There is nothing to configure in this step. Let’s Encrypt validates your hostname through the CNAME you just added, and the wizard’s own wording sets the expectation: issued after CNAME validation, usually within a minute.
Until then, the resource answers HTTPS with a self-signed placeholder, so a browser warning right after creation is expected, not a problem. On the SSL tab, the Free Let’s Encrypt section shows the current status; before DNS is in place it reads Let's Encrypt PENDING with No SSL issued yet.
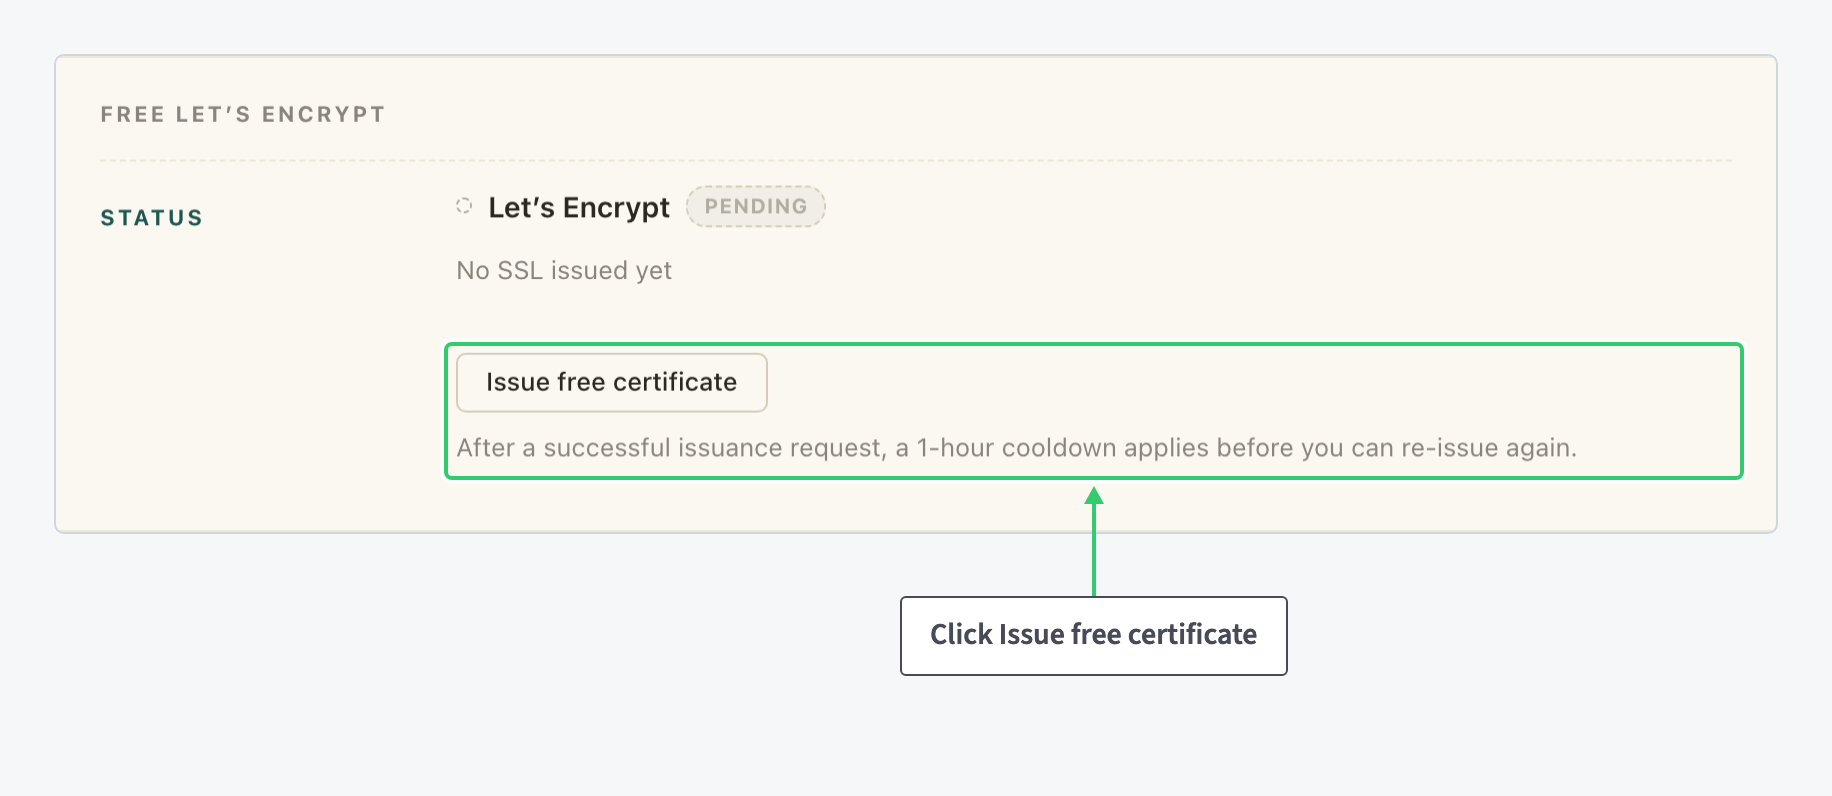
To trigger issuance instead of waiting, click Issue free certificate. Note the limit under the button: after a successful issuance request, a one hour cooldown applies before you can re-issue. Full detail: Add SSL certificates to your CDN.
Step 4: Verify traffic serves from the edge
Reload the resource’s General tab and watch the line under the CNAME record. The amber Not pointing here yet marker is your DNS check: once the record propagates, the panel sees your hostname pointing at the CDN, and certificate validation can complete.
Then confirm the certificate from both sides. Send production traffic only after both checks pass:
- In the panel: open the SSL tab and confirm two states: the Free Let’s Encrypt status is
Active, and the Active certificate card lists the Let’s Encrypt certificate in use, not the self-signed placeholder. - From outside the panel: open your hostname over HTTPS in a browser; this walkthrough uses
https://cdn.example.com, so replace it with your own hostname here and in the command below. Confirm the page loads without a certificate warning and the browser reports the Let’s Encrypt certificate. For a scriptable check, read the issuer directly:
curl -svI https://cdn.example.com 2>&1 | grep -E 'subject:|issuer:'Confirm the issuer line names Let’s Encrypt. While the status is Pending, the resource still serves the self-signed placeholder, and visitors you send to it see a certificate warning. Keep production traffic on your current setup until the status is Active and the external check confirms a valid certificate.
From now on, visitors land on the CDN and only cache misses travel to your origin. One consequence to know from the start: when you change a file, the edge keeps serving the cached copy until it expires or you purge it. Purge a URL or your entire CDN cache covers one URL, a folder, or everything.
What you’ve built
A hostname served from the CDN edge, secured by a certificate that renews itself, backed by an origin that receives requests from the CDN only when a visitor asks for something not yet cached. One wizard, one DNS record, and a certificate that manages itself.
None of the quick-start choices are permanent. The protocol, the certificate and the origin all live in the resource settings, and the usual next step is switching the protocol to HTTP→HTTPS once the certificate is live, so old links get redirected instead of dropped. Every further resource in your package follows these same four steps.