
An online store is two sites in one. Product photos, CSS and JavaScript are identical for every visitor and belong at the edge; the cart and the checkout are personal to each shopper and must never come from a cache. This guide splits your storefront along that line: static paths served fast from the CDN, your origin shielded from redundant traffic, and the checkout proxied straight through, untouched.
Nothing here is a new product. Six steps combine features your CDN resource already has: locations and upstreams, compression, Origin Shield and purge. Each step condenses a tutorial that covers every field; follow the links when you want the detail.
Prerequisites
- An active CDN package with a resource created for your store’s hostname and serving traffic. See Add your first CDN resource.
- A store whose images and static assets live under stable URL path prefixes, for example
/images/and/assets/. - Client Area access to the package.
- Optional: an object-storage bucket reachable over HTTPS, if your product imagery lives outside your web server.
Why split by path instead of caching everything
- Product pages get faster where it matters most: imagery and assets are the bulk of a storefront page’s weight, and they are exactly the content an edge cache serves best.
- The checkout stays correct: a cached cart is another shopper’s cart. A per-path cache bypass makes that class of bug structurally impossible.
- Your origin survives the campaign spike: cached paths rarely contact the origin, and Origin Shield funnels the misses that remain through one shared layer.
Step 1: Plan the path split
The mechanism is locations: path-based routing rules, where each location can override cache, ACL, headers and rate limiting from the resource’s defaults. More specific prefixes win over the catch-all /, and a resource holds up to 10 locations.
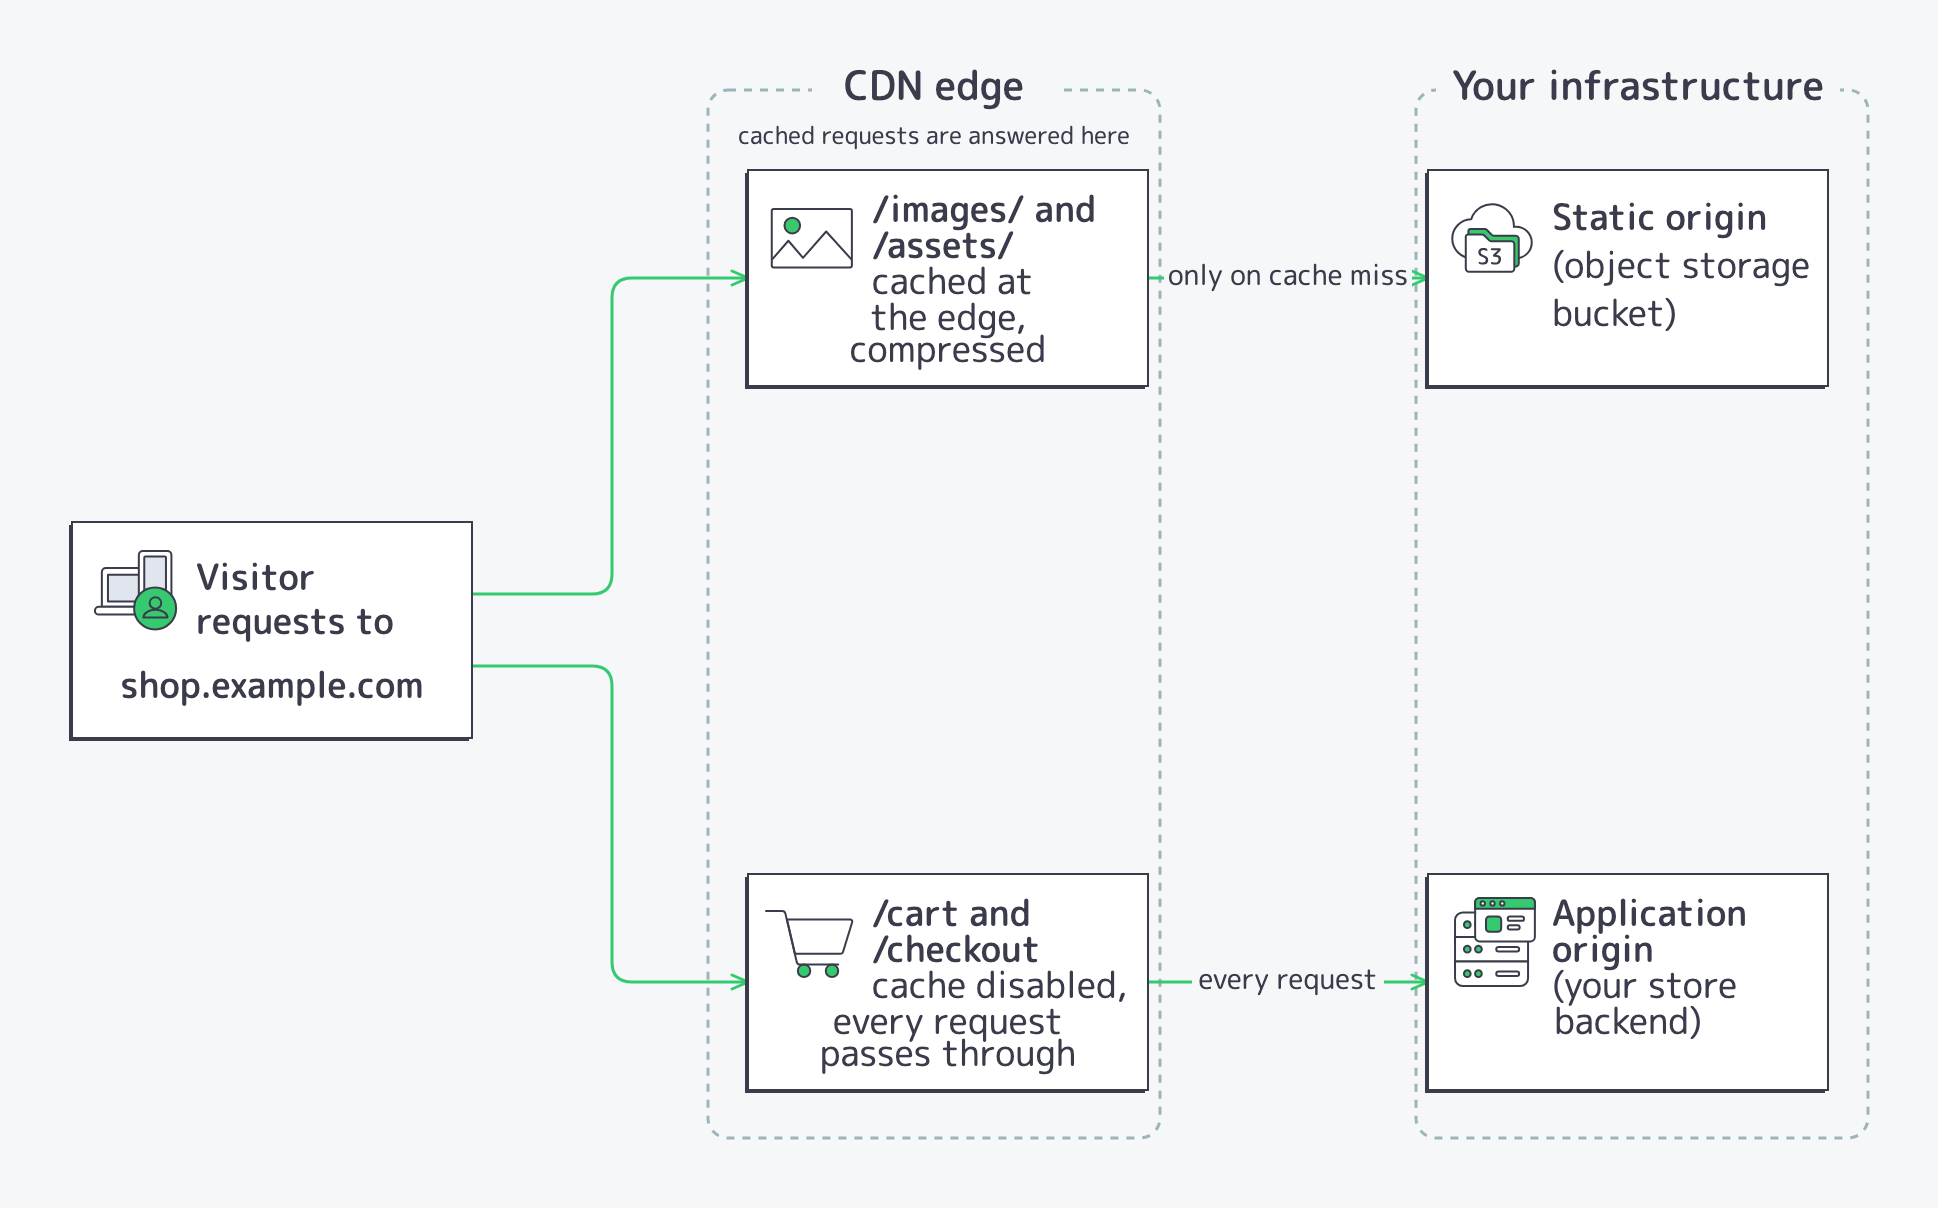
The boundary is the benefit: everything inside the CDN edge is answered without your servers being involved. Only cache misses and checkout traffic cross into your infrastructure.
Map your store onto that model before you open the panel. The typical storefront needs four rules:
| Path prefix | Treatment |
|---|---|
/images/ |
Product photos. Cached at the edge; served from your web server or a bucket. |
/assets/ |
CSS, JavaScript, fonts. Cached at the edge and compressed. |
/cart/, /checkout/ |
Shopper sessions. Never cached; every request proxies to the origin. |
/ |
Everything else. Keeps the resource defaults. |
Swap in the prefixes your platform actually uses; only the split matters. The rest of this guide builds these rules in order.
Step 2: Route the static paths
In the Resources table of your package, click the gear icon (Edit resource settings) on the resource’s row, click Advanced settings, then open the Origins tab. In the Locations panel, click + Add a Location, enter /images/ as the path and a note like Static images as the description, and click Save:
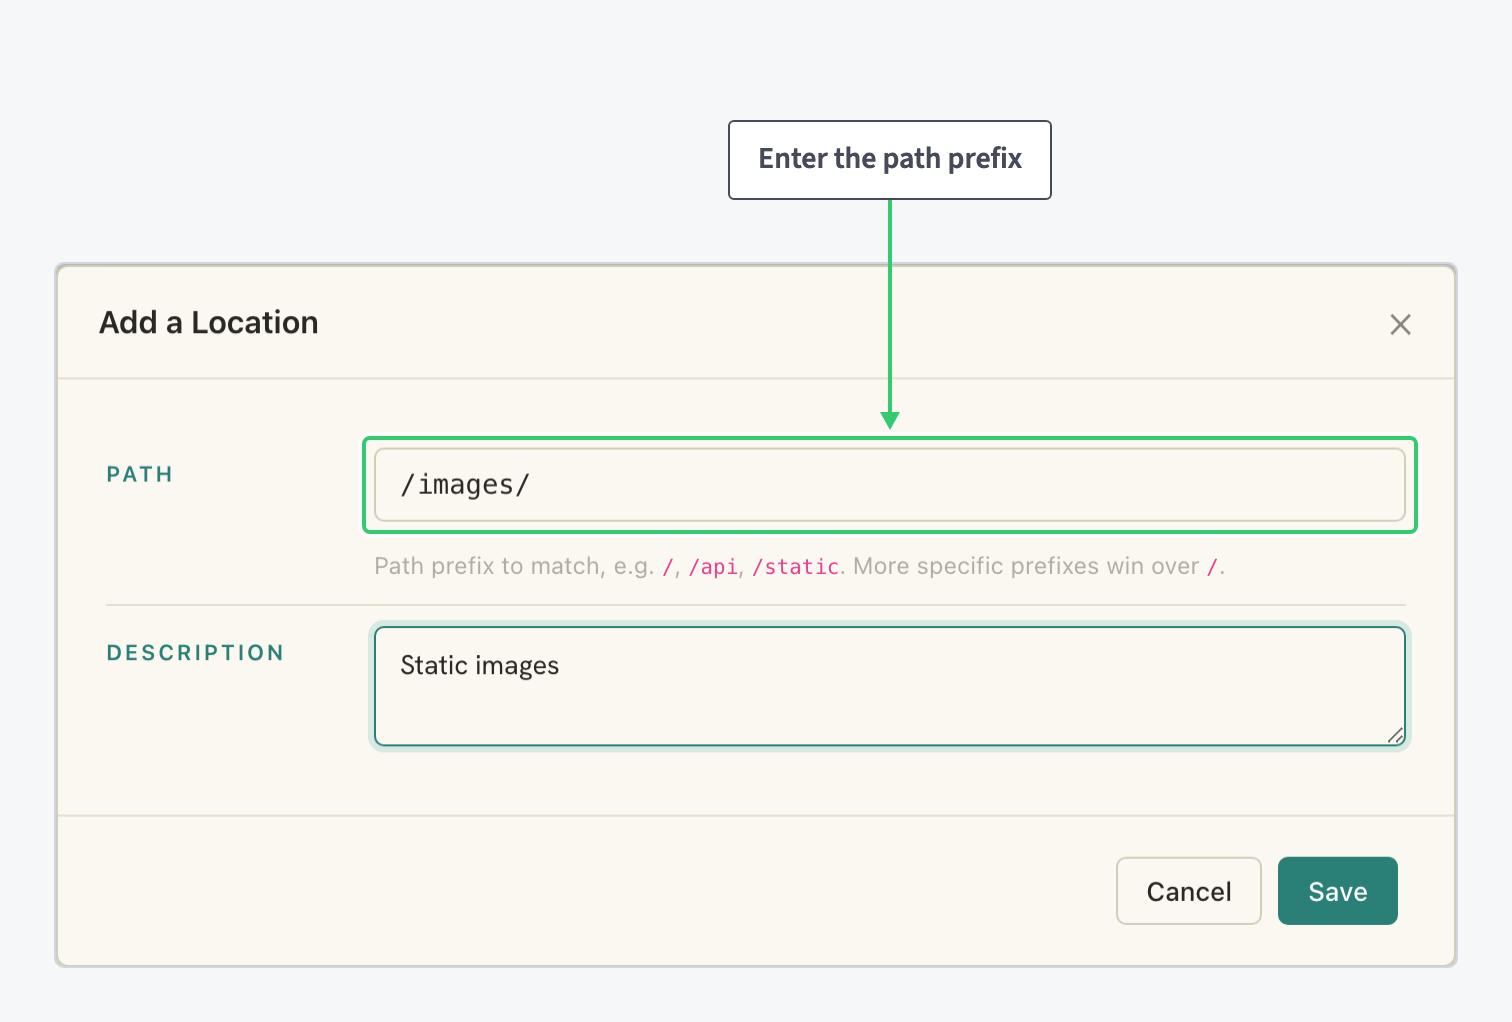
Repeat for /assets/. More specific prefixes win over /, so these two locations now catch their traffic while everything else keeps following the catch-all. Full detail: Route and configure a specific URL path on your CDN.
By default each new location uses the resource’s default upstream: your web server. If product imagery lives in an object-storage bucket instead, add an upstream for it: the server address field accepts an IPv4 address or a domain name, so a bucket’s endpoint hostname works like any other origin, with HTTPS to origin switched on. Then point the /images/ location’s Upstream selector at that pool. Full detail: Add multiple origins and failover to your CDN.
Step 3: Compress the assets
Caching is already working for you: the static paths serve from the edge, and only cache misses travel to the origin. Compression is the switch you still have to turn on. Open the General tab of the advanced view and find the Cache & Compression section with its four collapsed rows: Gzip, Brotli, Cache Valid and Cache Use Stale.
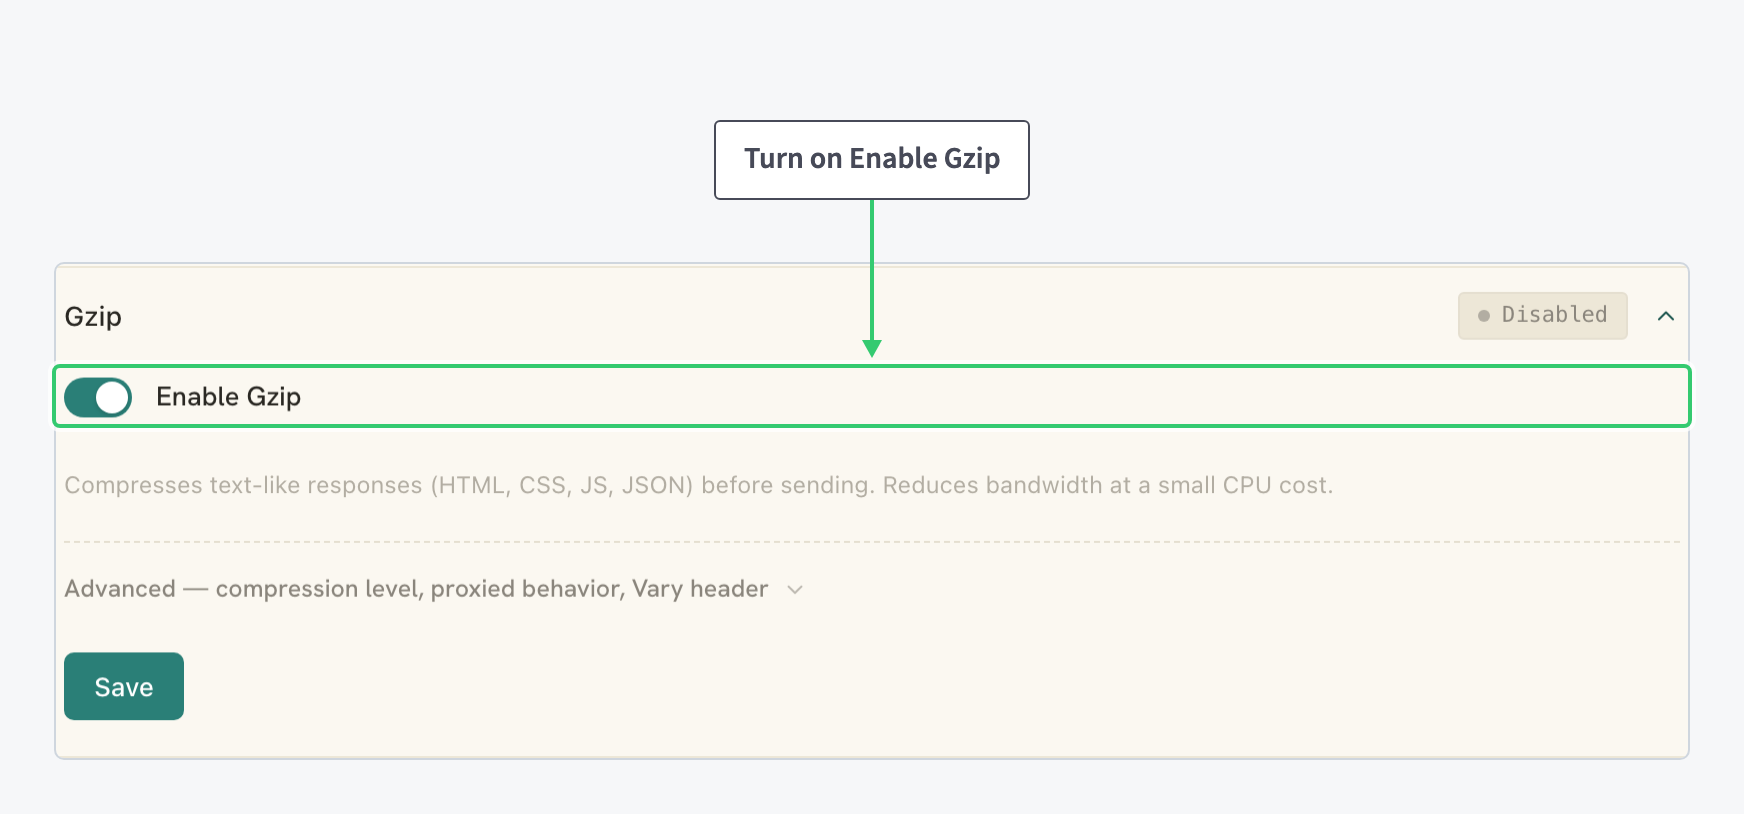
Expand Gzip, switch on Enable Gzip, and click the section’s Save. Gzip compresses text-like responses (HTML, CSS, JS, JSON) before sending, cutting bandwidth at a small CPU cost:
Do the same for Brotli: it offers a better compression ratio, and newer browsers prefer it when both are enabled, so the two rows work as a pair. Your product photos are unaffected either way: JPEG and WebP are already compressed formats, and these editors target text-like responses. For imagery, the edge cache provides the entire benefit.
Each location card on the Origins tab carries its own Cache & Compression rows, so a path can override these defaults if it ever needs to. The Cache Use Stale row in the same group is also worth considering: it keeps cached pages serving when the origin fails, covered in How to minimize downtime when your website is down. Full detail: Enable Gzip and Brotli compression on your CDN.
Step 4: Shield the origin
Still on the advanced General page, the Origin Shield row sits in the Connection area, under the Protocol selector. It routes cache misses through a shared edge node, which removes redundant origin hits and protects your origin from direct traffic.
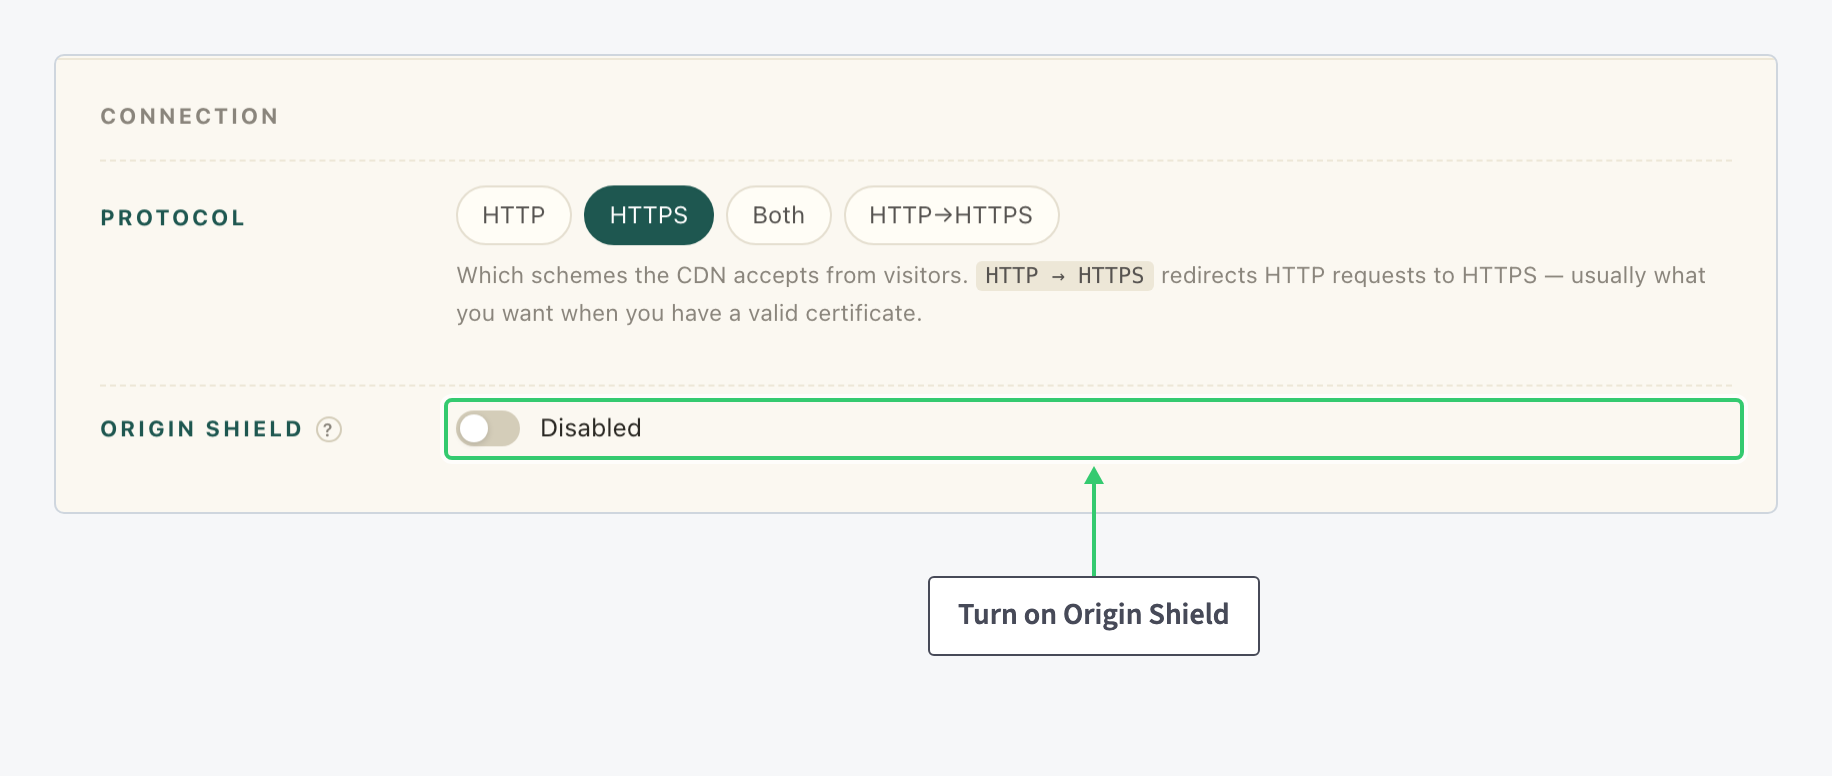
Click the toggle, then apply it with the resource form’s Save bar (this row belongs to the main form; the sections below it save individually). For a store this is protection against traffic spikes: when a campaign starts and every edge requests the same product photo at once, the misses funnel through the shield instead of each edge asking your origin separately. Full detail: Enable Origin Shield protection on your CDN.
Step 5: Keep cart and checkout off the cache
Back on the Origins tab, add two more locations the same way as in Step 2: /cart/ and /checkout/, both left on the default upstream. Then click each new location’s row to expand its card. Every card carries the same sections; the catch-all / is the one expanded here:

In the card’s General section, switch on Disable Cache and click the section’s Save. The location now proxies every request straight to the origin: the standard treatment for dynamic APIs and authenticated endpoints, and exactly what a checkout needs.
Because more specific prefixes win over /, these two rules hold no matter how aggressively the rest of the resource caches. Every add-to-cart click and every payment page is now a live round trip to your store.
Step 6: Purge on deploy
One habit completes the architecture. The edge keeps serving a cached file until it expires or you purge it, so a deploy that changes your CSS, or a product shoot that replaces photos, ends with a purge.
In the Resources table, click the Clear cache icon in the resource’s Actions column and enter a relative path: end it with / to clear a whole folder and everything under it, exactly what a deploy requires.

Three purges cover routine store operations:
assets/after a deploy that ships new CSS or JavaScript.images/product-123.jpgwhen one photo changes.- An empty path only when everything changed: it clears the whole resource, and your origin answers every request until the cache refills.
Full detail: Purge a URL or your entire CDN cache.
What you’ve built
A storefront that serves its heaviest content from the edge. Product photos and assets serve from the edge, compressed where compression helps; the misses that remain funnel through Origin Shield instead of reaching your origin separately; and the cart and checkout bypass the cache entirely, every request answered live by your store.
The split also gives every future rule a place. A new asset folder is one more location; a path that needs its own headers, access rules or rate limits overrides just that group on its card. Ten locations per resource is room for a much bigger store than the four rules you started with.